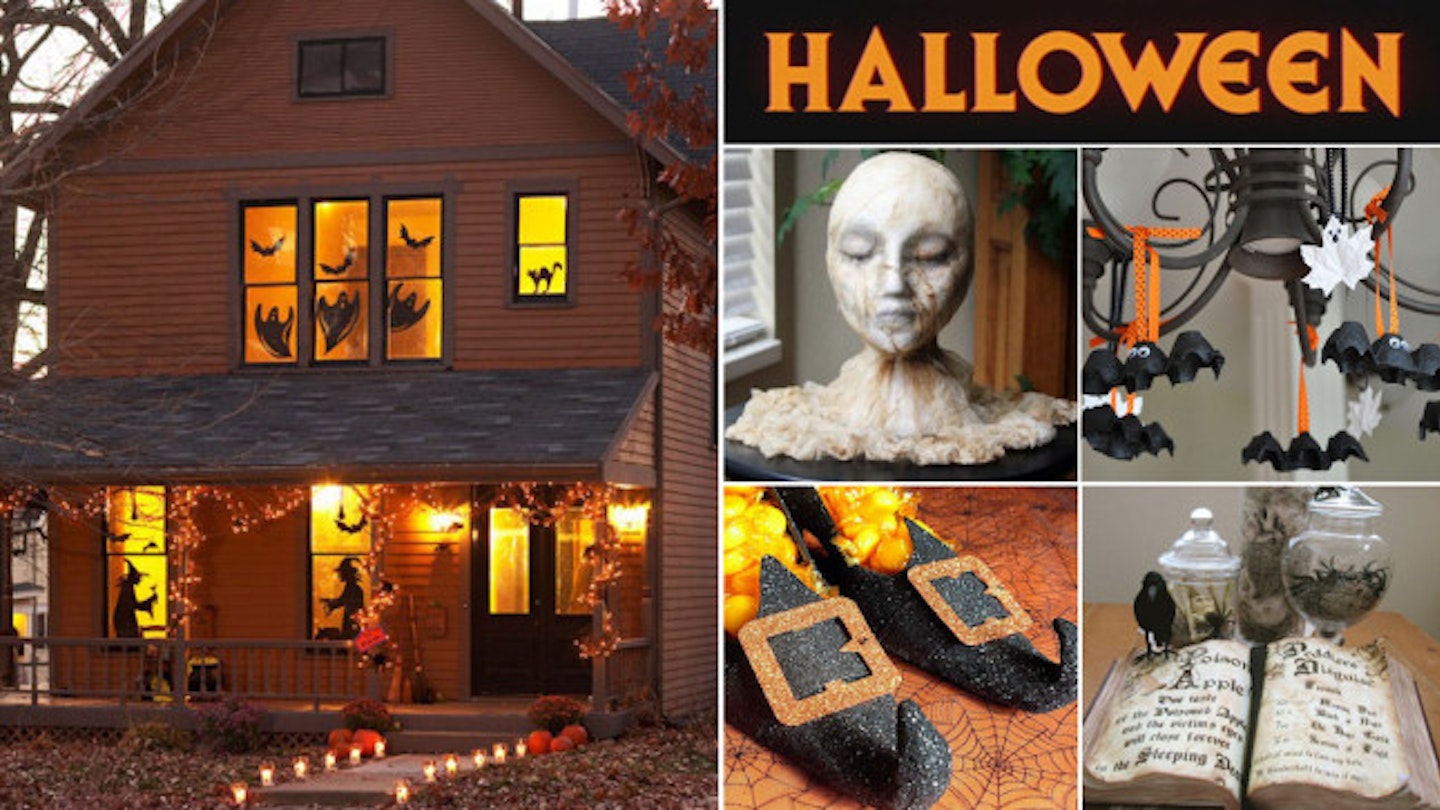
Are you throwing a Halloween party? These crafty DIY decorations and props will help you set the (spooky!) scene on a budget…
There's a lot of pressure when you're throwing a Halloween party; you need to invite everyone, have good food and drinks, amaaaazing music, maybe even a few tricks and of course, decorations!
If you're throwing a Halloween party your house has got to look spooky, right? Unfortunately with Black Friday and Christmas round the corner, you're not going to want to splash a lot of cash so that's why we've rounded up 23 ways you can make some decorations for your Halloween party without breaking the bank!
Lots of the tools you'll need to make these decorations are probably hanging around your house, so read on to find out how you can save a fortune...
WATCH: Makeup inspiration for Halloween this year...
1. Scary 'candle' lanterns
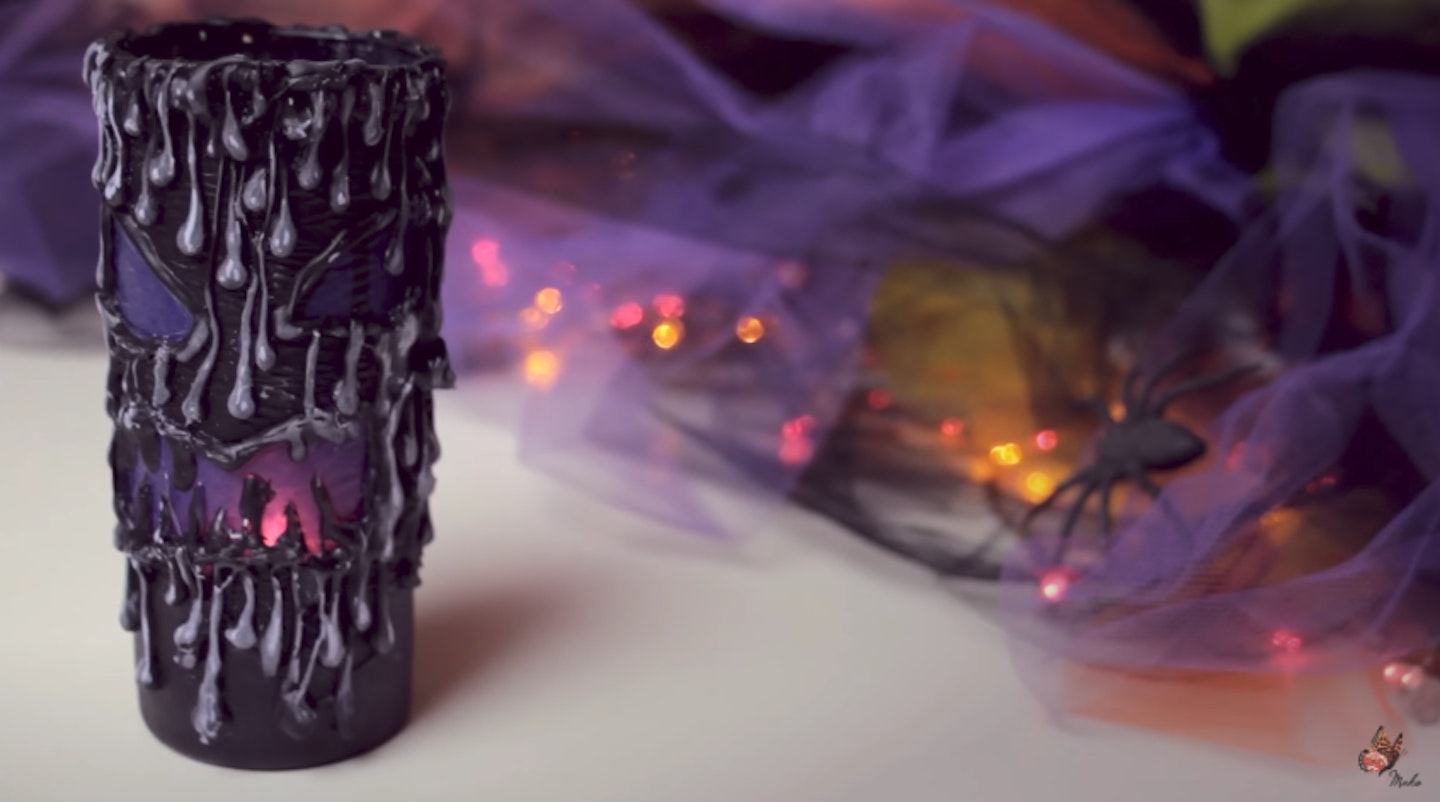
This one looks complicated but it is, in fact, ultra-easy to recreate from the comfort of your own home.
And it’s just so effective, isn’t it?
You will need…
-
Long drinking glass
-
Transparent tissue paper (ideally in red, purple, orange, or green)
-
Pencil (white is easiest)
-
Hot glue gun
-
Scissors
-
Normal crafting glue
-
Blackboard paint
-
Brushes
-
Chalk
Let’s break it down into easy-to-follow steps…
-
First, wrap the paper around your glass. Hold it in place - don’t glue it down; this is just to get an idea of where to draw your face!
-
With your white pencil, start lining out the eyes and the mouth.
-
Put the paper onto your desk and finalise the eyes and mouth until your happy with the shapes.
-
Cut off the excess paper around the face, leaving about 2cm around the sides.
-
Apply glue to the back of the paper, covering the edges properly.
-
Attach it to the centre of the glass.
-
Using your hot glue gun to outline the eyes and mouth, using the guidelines you drew earlier.
-
Add some hot glue to the top of the glass in a wavy motion, imitating the look of melting wax (try to include some dripping down the face for extra impact.
-
Cover up the whole glass (bar the face) with dripping ‘wax’ drops to give it an ultra-textured look.
-
Let everything dry and cool down.
-
Cover your glass with blackboard paint, avoiding the eyes and mouth of your face.
-
Once dry, colour the drops of wax with some chalk and blend, to get a 3D effect.
-
Seal the surface with hairspray.
-
Pop in a small tea candle and voila!
Watch the video below to see how to make a scary Halloween candle lantern to decorate any room in your home!
2. Glowing eyes in the garden...
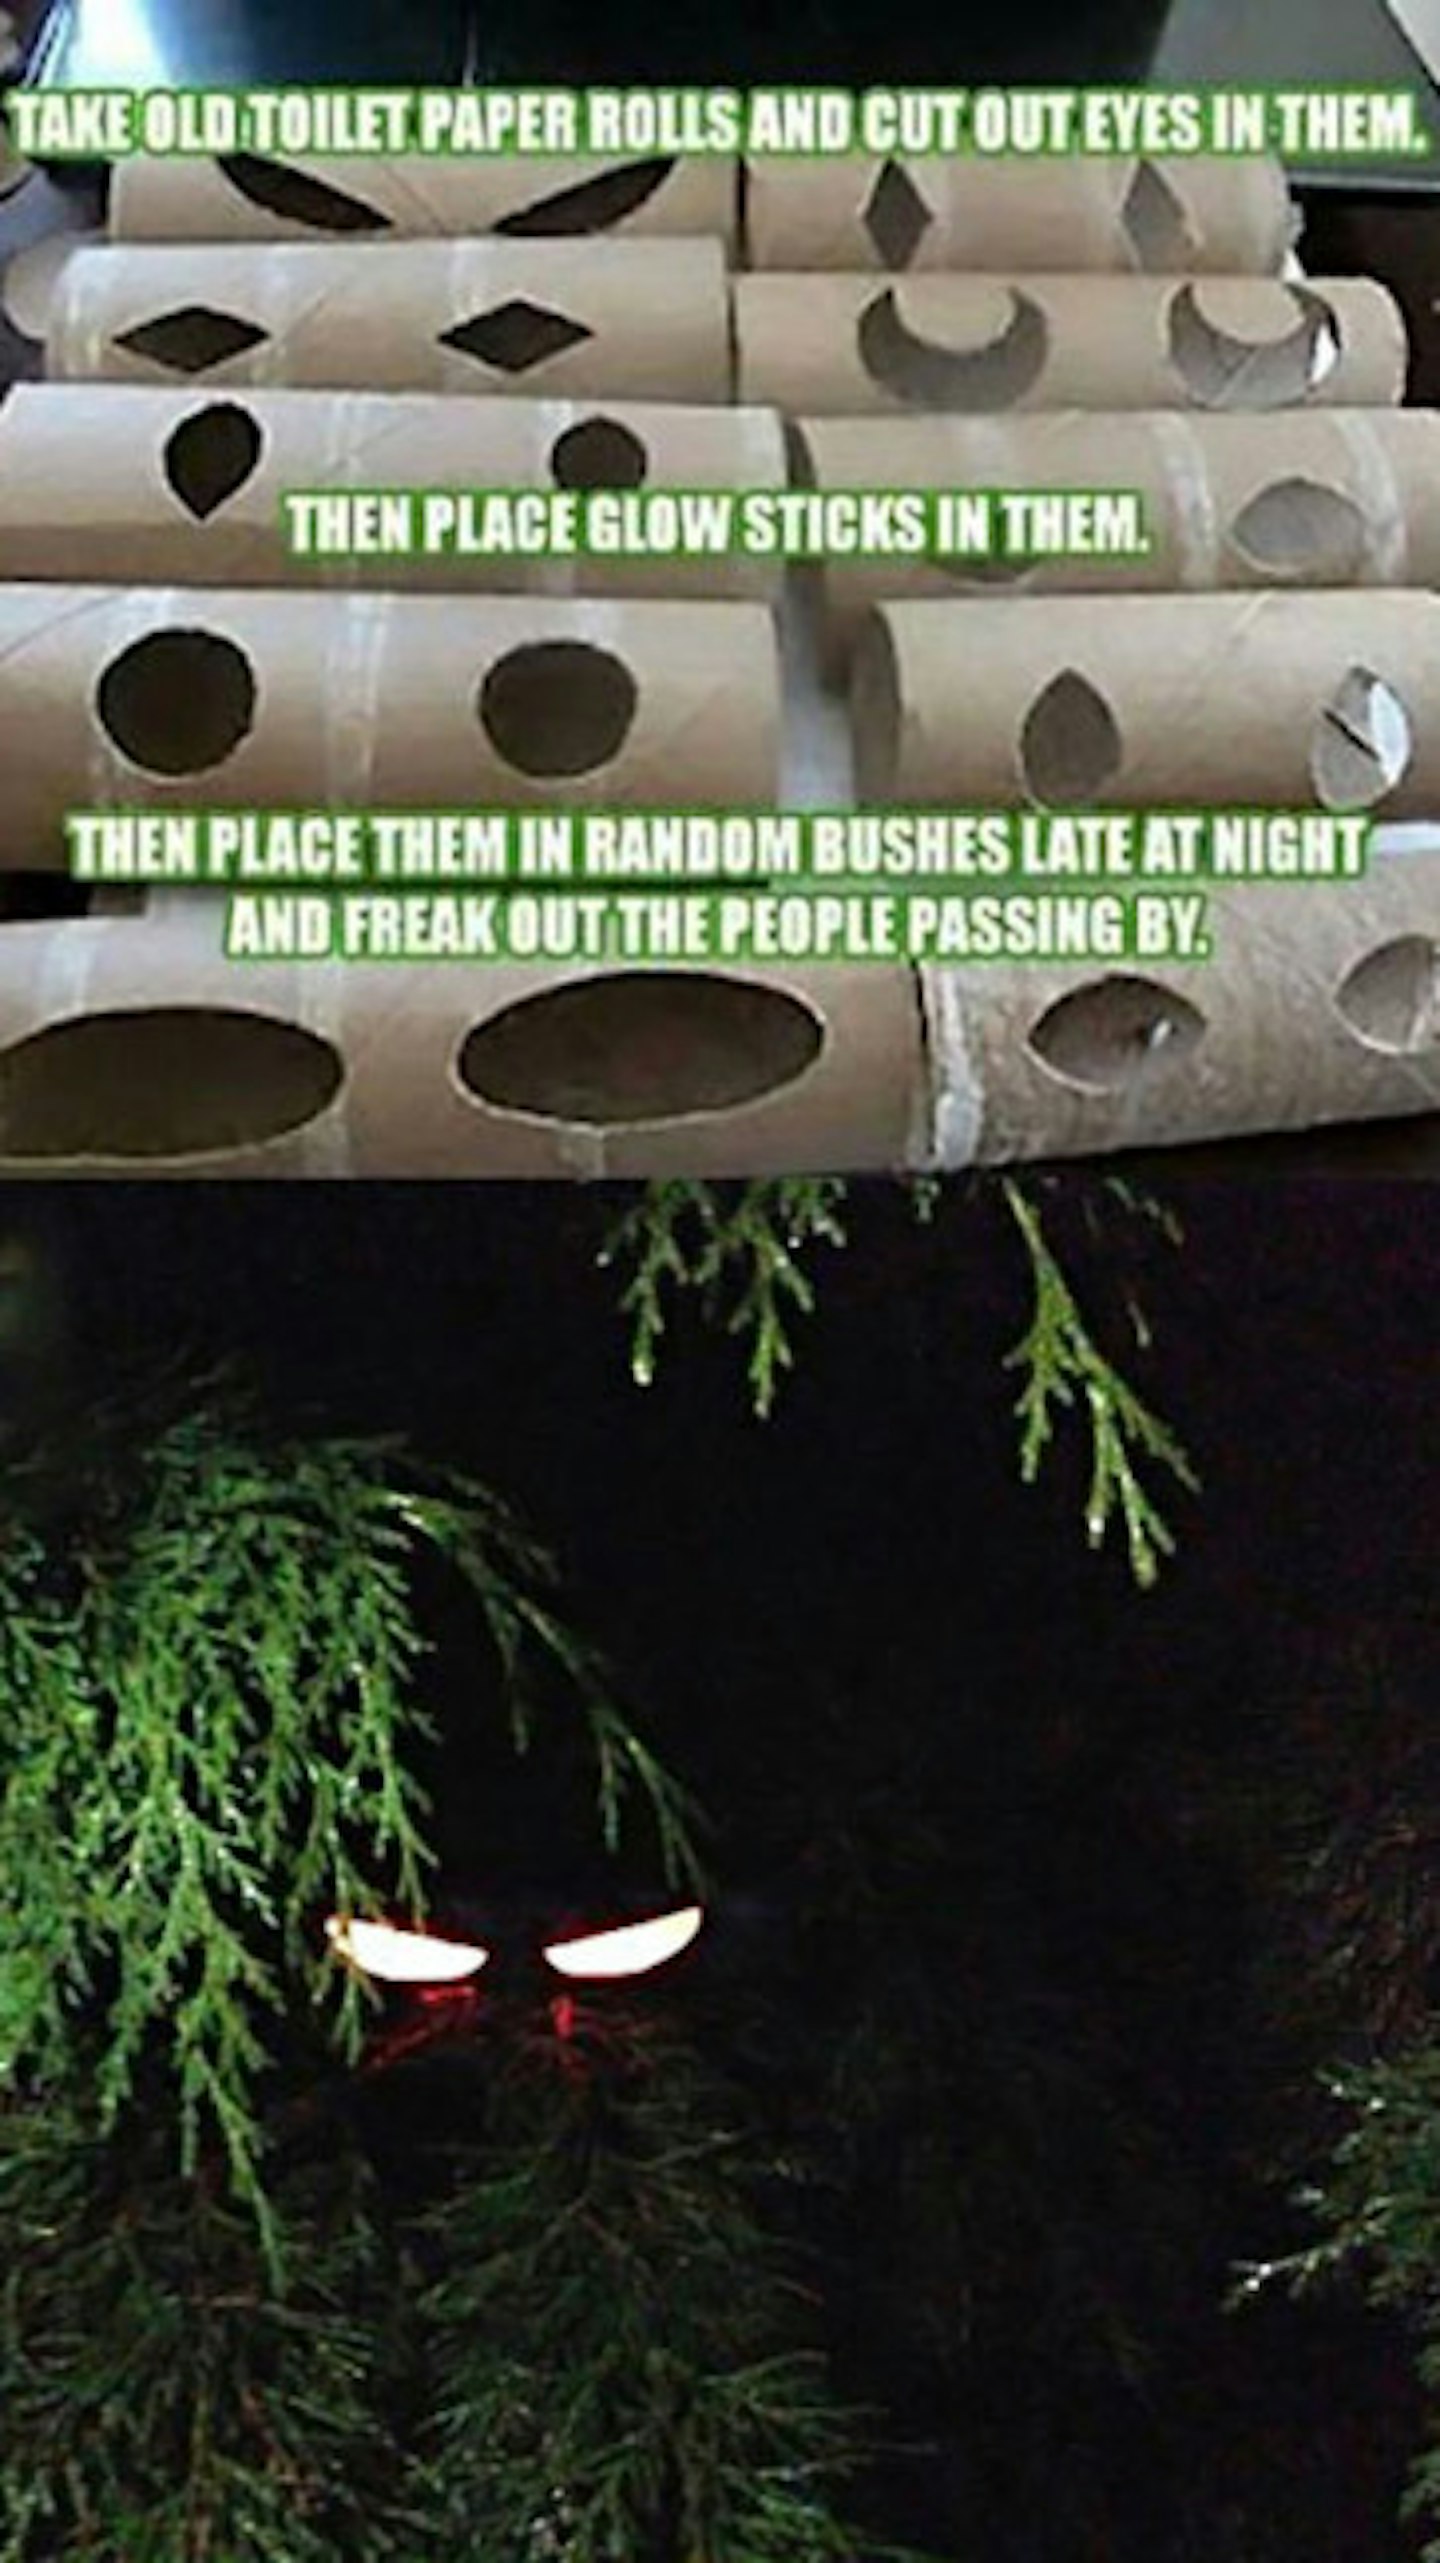
The tools for this one are very cheap to source, we reckon you've got everything you'll need in your own house. It’s very easy to make and better still, it looks oh-so-effective at Halloween parties.
You will need…
-
Old toilet paper rolls
-
Pencil
-
Black paint (optional)
-
Scissors
-
Glowsticks
Let’s break it down into easy-to-follow steps…
-
Using your pencil, draw eyes onto the old toilet paper rolls.
-
Take your scissors and carefully cut the eyes out of them.
-
If you wish and have the time, paint the toilet rolls black.
-
Pop a glow stick inside.
-
Place the tubes around your garden, so that, at night, the eyes light up and give people a wicked Halloween scare!
Project found on Pinterest.
Freaky floating ghost
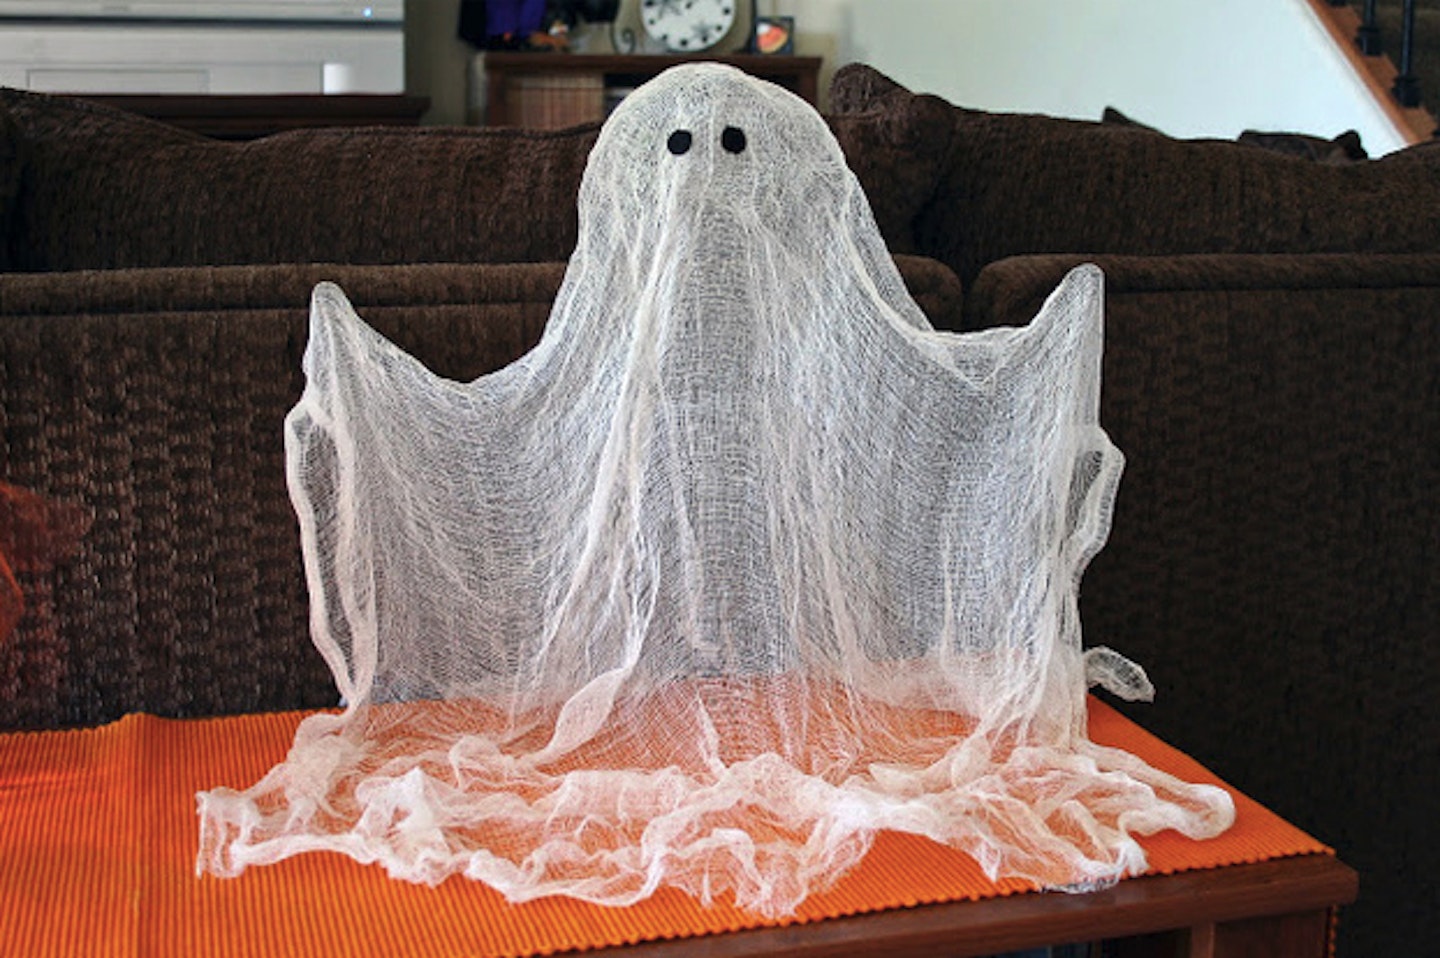
We can’t decide if this homemade ghost is spooky or adorable, but we do know that we want to recreate him for our Halloween party.
Thankfully, it’s all very easy.
You will need…
-
An empty 1 litre bottle
-
Starch
-
Cheese cloth
-
Old towel
-
Scrap piece of felt
-
A styrofoam ball (the white kind works better.)
-
Scissors
-
Wire
-
Hairdryer (optional)
Let’s break it down into easy-to-follow steps…
-
So first off, you need to build a ghost shape out of a soda bottle, wire, and a ball
-
Then you spray it with starch and leave it to dry
-
Carefully remove the wires and bottles to showcase your Halloween ghost

Here’s the blog you need to visit if you want the full instructions for this Halloween DIY project.
4. Bloodied and dripping candles
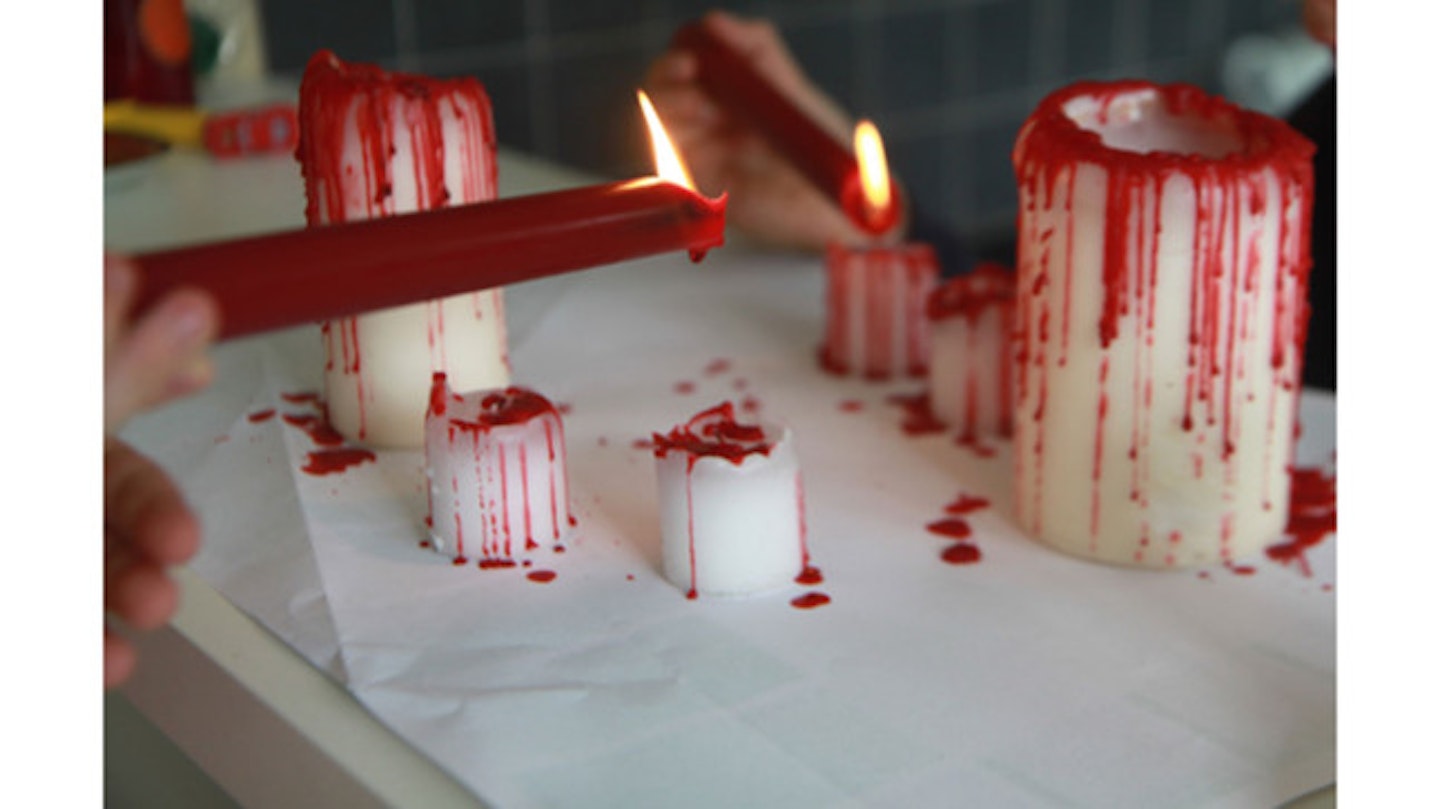
These will look fabulous dotted around your Halloween party (candlelight always adds to the atmosphere, doesn’t it?), and they’re just so simple to make.
You will need…
-
A variety of white candles
-
A red candle
-
A lighter or matches
Let’s break it down into easy-to-follow steps…
This is a super easy idea that looks like it takes a lot more work than it actually does. Phewww.
-
All you need to do is light a red candle and let it drip down onto the top and sides of the white candle. Easy!
5. Monstrous spider-webs
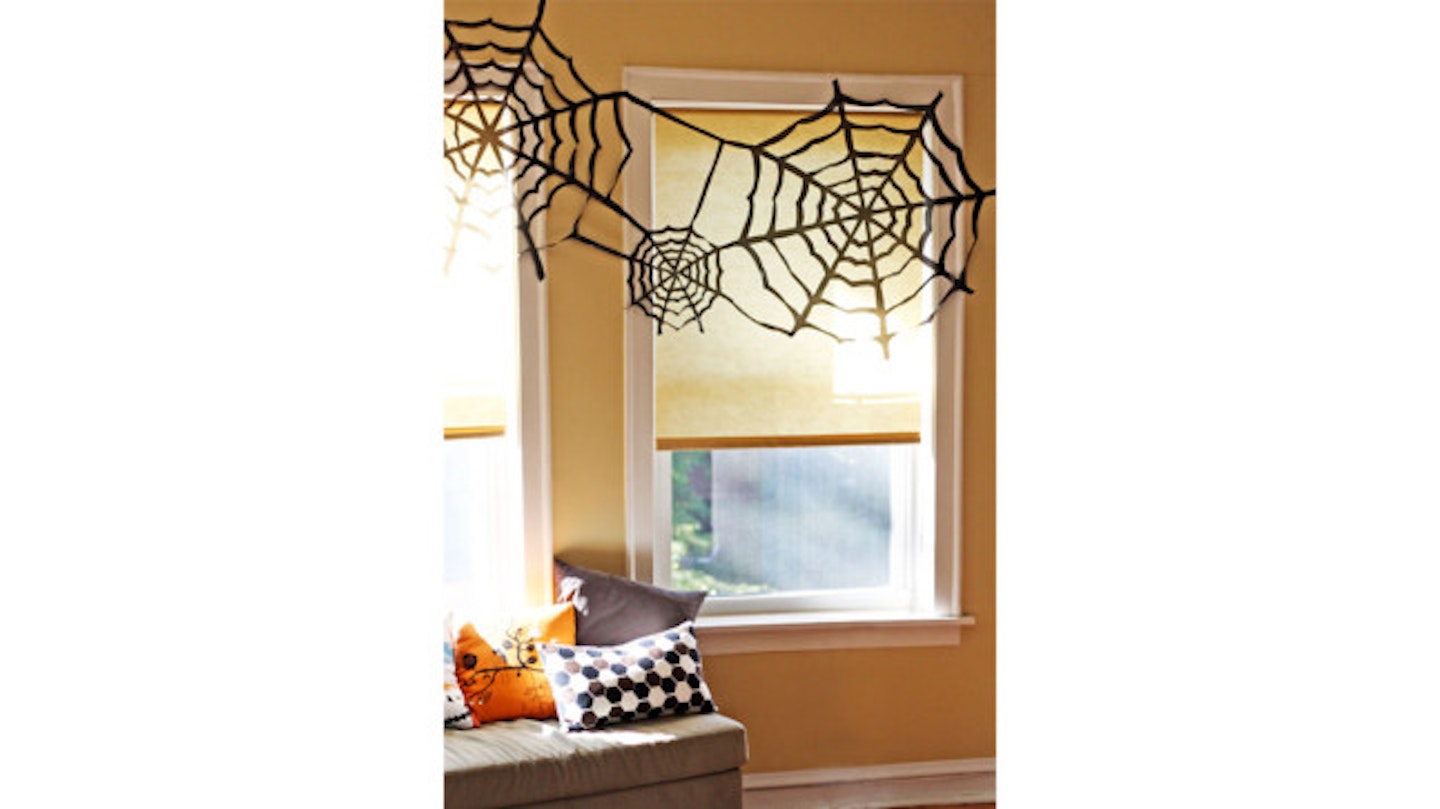
Plenty of people are afraid of spiders, so it makes sense that they’re such a big feature at Halloween. These giant spider-webs look amazing - and they’re only made out of bin bags.
Yup, we’re deadly serious. How crafty can you get?
You will need…
-
Black bin bags
-
Sellotape
-
Black sharpie pen
-
Scissors
Let’s break it down into easy-to-follow steps…
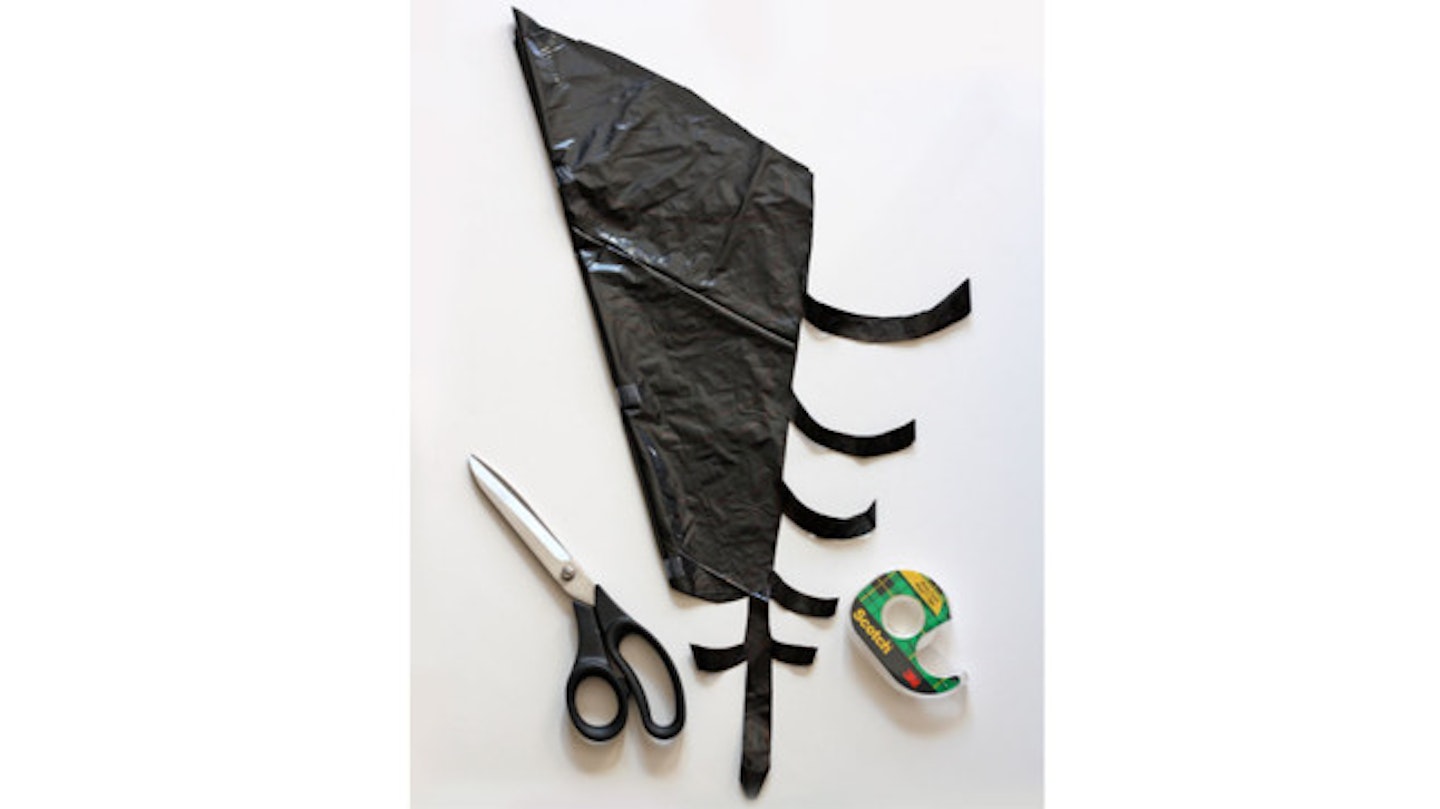
As you can guess, it’s very like making cut-out snowflakes from paper - only a lot spookier and a little more slippery (plastic bags will do that to you).
Get the full instructions over at How About Orange now - the blog is packed full of amazing DIY prjects for Halloween.
6. Deadly poison bottles
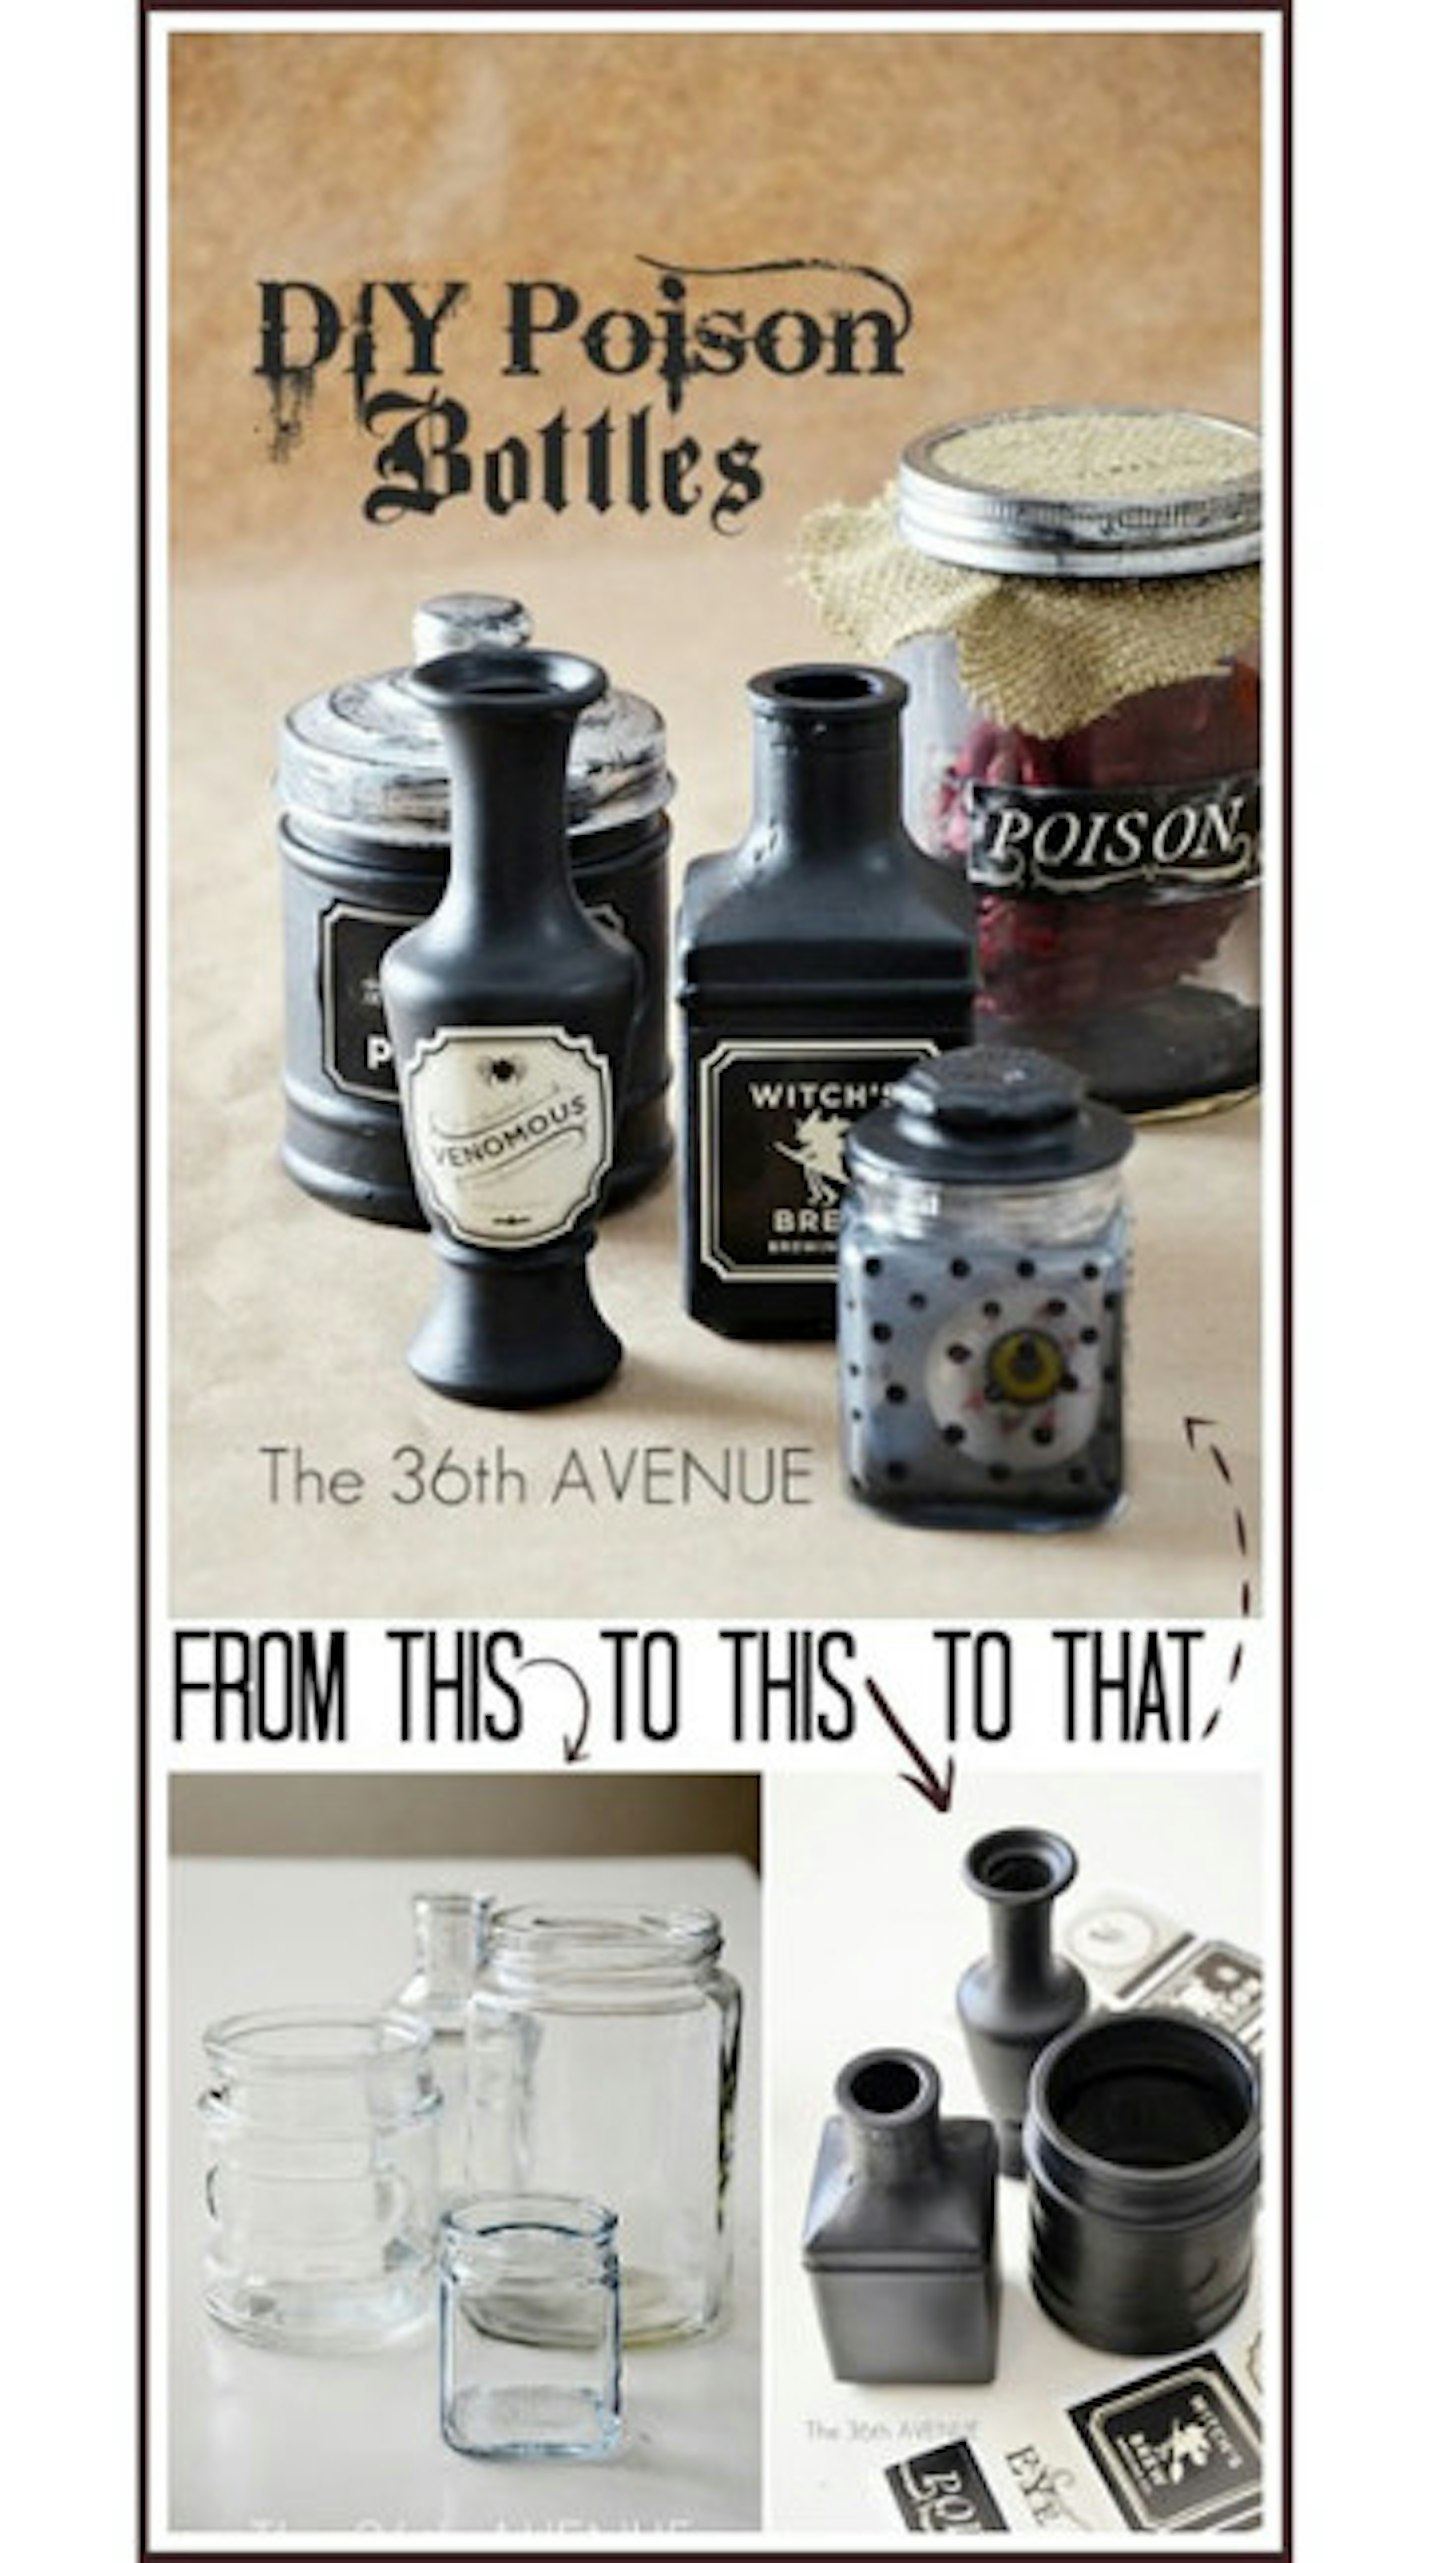
Whether you fill them with sweets, drinks, or just have them as decorations, these DIY poison jars are sure to add a little extra something to your Halloween shindig.
You will need…
-
DecoArt Glass Stain
-
Blackboard Paint
-
Brush
-
Glass or ceramic bottles and jars
-
A plastic eyeball (or a decorated ping-pong ball)
-
Labels
-
Pens
Let’s break it down into easy-to-follow steps…
Essentially, this one is about being creative and letting your artistic juices flow. Ask yourself this: What would a wicked witch have stocked in her cupboard?
Stain the glass jars with black glass stain (or, alternatively, fill with water stained with black, red or green food colouring).
Paint some of the bottle with blackboard paint and set aside to dry.
Use your labels and eyeball to create that spooky vibe!
Get the full instructions over at The 36th Avenue now - their site is packed full of epic DIY projects for Halloween.
7. The chains of sinners
Jacob Marley, one of the most famous ghosts in all of literature, popped up to say ‘boo’ to Ebeneezer Scrooge wearing the terrible chains he created for himself during his sinful life.
And, ever since then, we’ve come to associate the clank-clank-clanking of chains with creatures from the other side.
While we don’t advise using REAL chains at your Halloween party, because they'd be pretty heavy to carry, hese awesome homemade ones are very effective and oh-so-easy to create.
You will need…
-
Scissors or a knife
-
Grey pipe insulation / grey pool noodle
-
Patience
Let’s break it down into easy-to-follow steps…
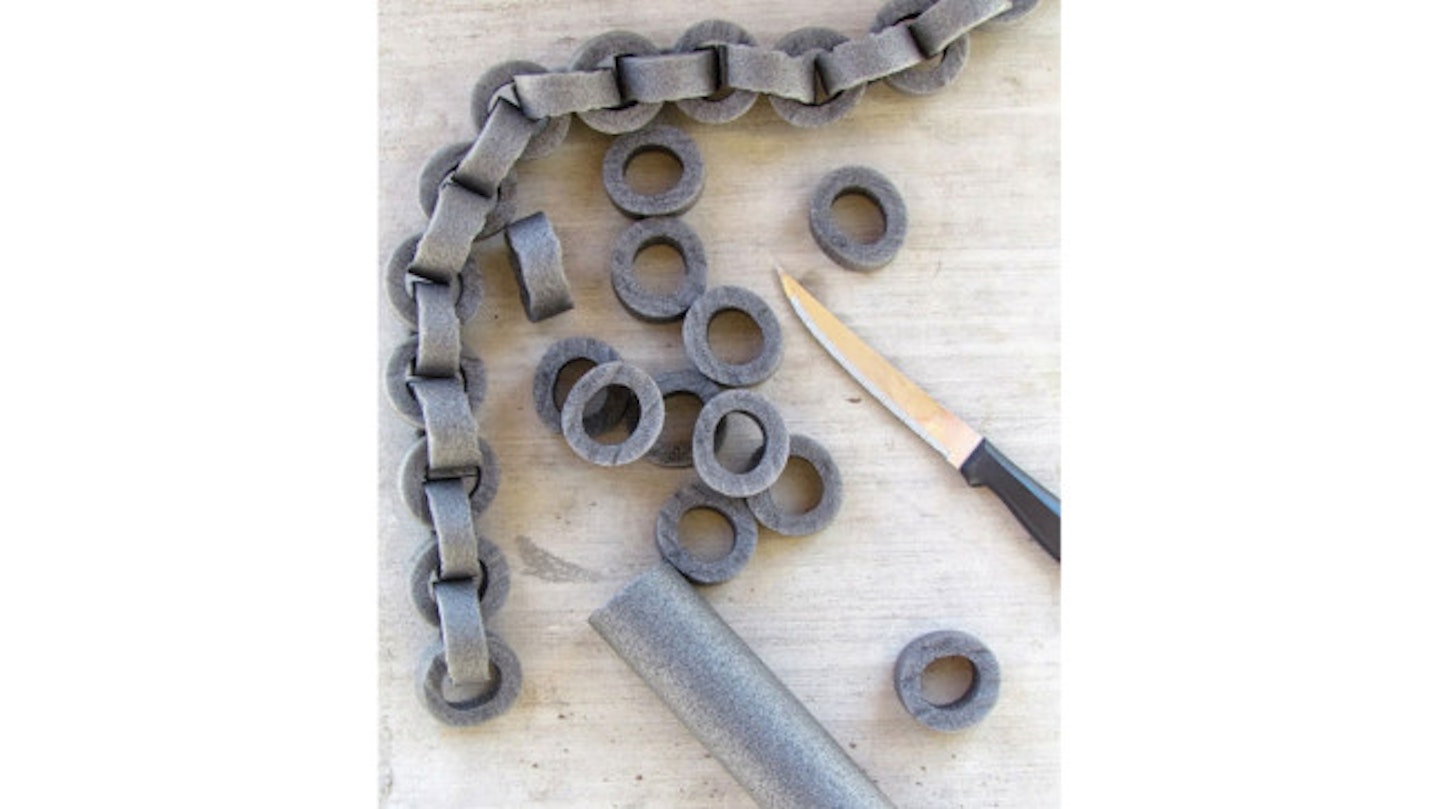
-
Using the scissors or the knife, slice along your pool noodle / pipe insulation as you would a loaf of bread. Each ‘slice’ should be a small circle.
-
Once done, carefully cut a small nick into one side of each circle.
-
Loop the circles together (like a daisy chain) by pushing each consecutive circle into the other.
-
Voila!
Get the full instructions over at Ribbons & Glue now - and make sure you check out all of their other amazing Halloween crafting projects while you're there!
8. Sinister spellbook
What witch’s house would be complete without a wicked spell book, eh?
You will need…
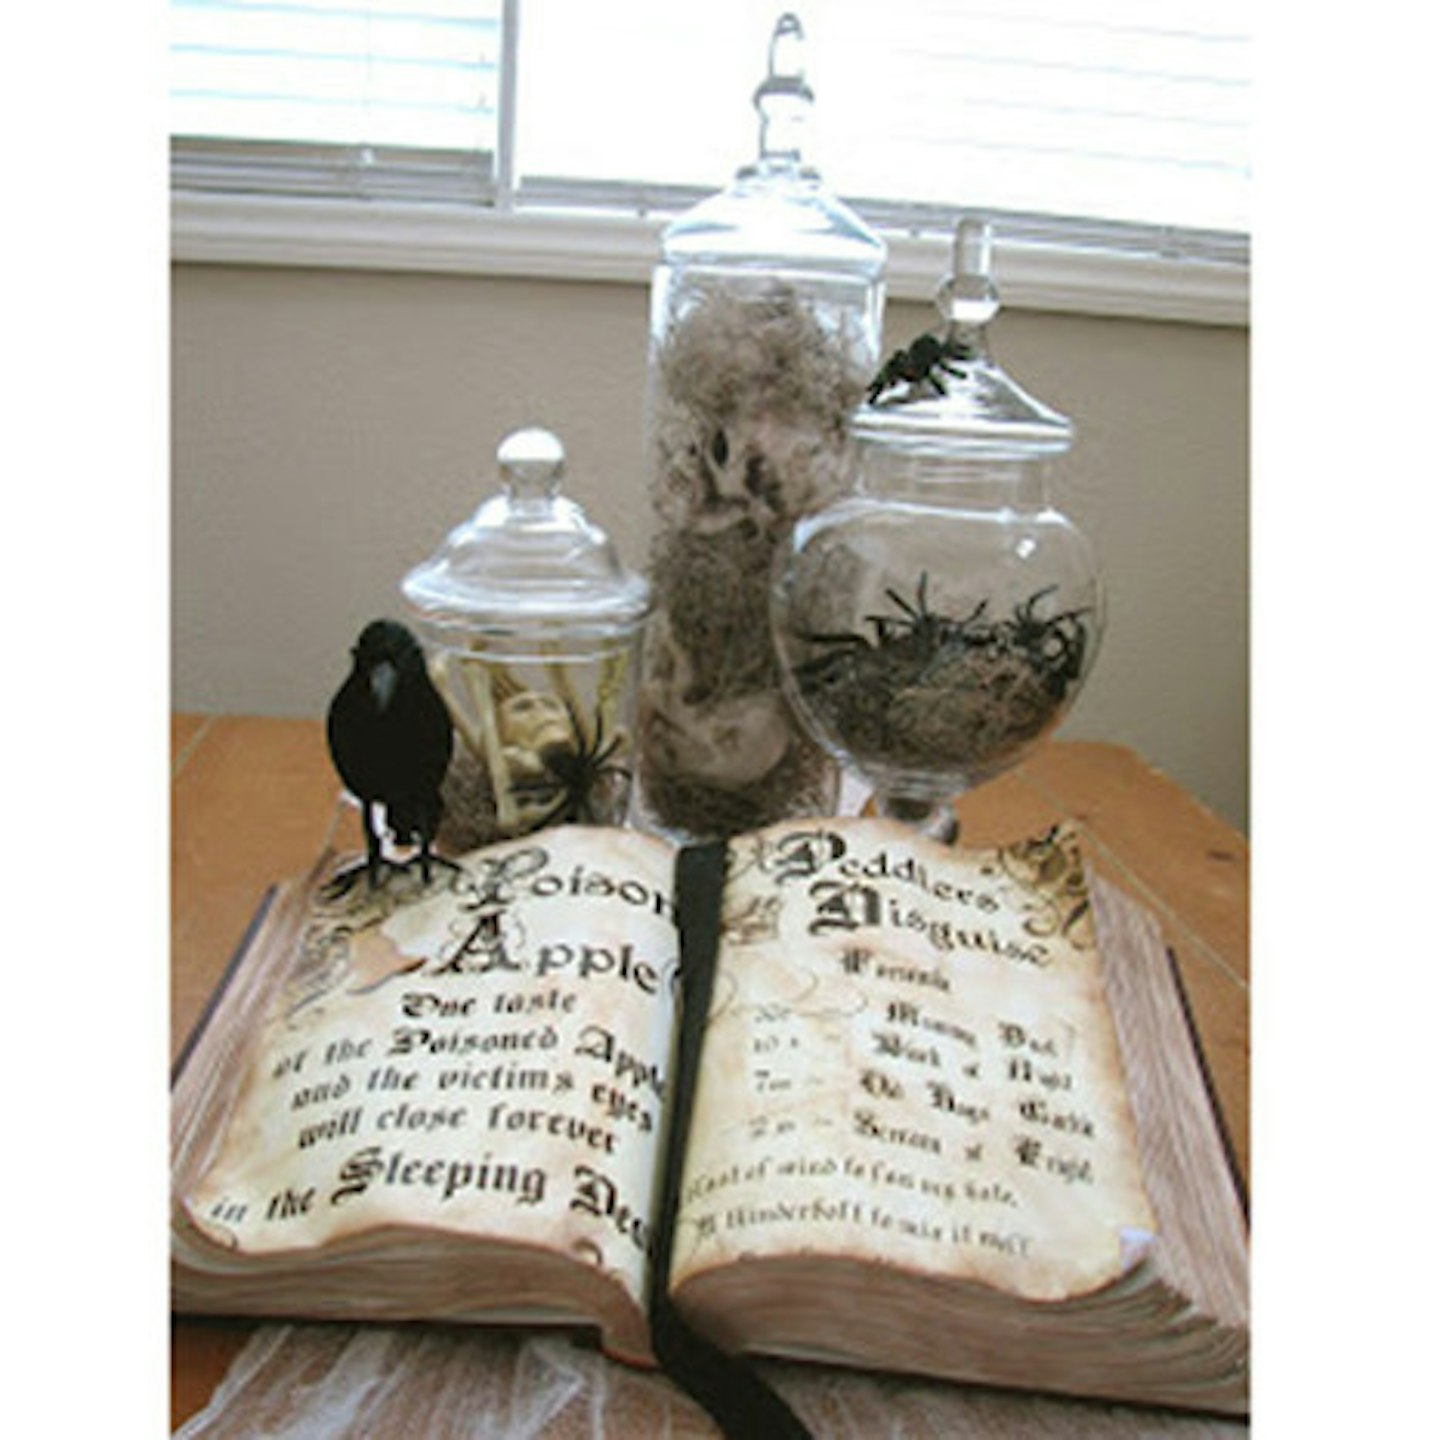
-
A large dictionary or thesaurus (try bagging one from your local charity shop)
-
Teabags
-
Coffee
-
Water
-
Paper and a printer
-
Black ribbon
-
Spray bottle
Let’s break it down into easy-to-follow steps…
-
Open up your old book to about halfway through.
-
Boil up some water, add tea bags, and allow to cool.
-
Brush the mixture over the two open pages of your book, as well as the sides and anywhere else you can see while it’s open.
-
Add some coffee to water, pop in a spray bottle, and spritz the pages as you flip through them too, to help soak them a little better.
-
Type out your spell pages (this site has two ready-prepared spells which should work really well) and cut them down to the size of your book.
-
Paint both pages with a mixture of tea water / coffee water, before setting aside on the windowsill to dry in the sun.
-
Once dry, slide them into the book and glue them into place.
-
Voila!
9. Bloody handprints on the windows
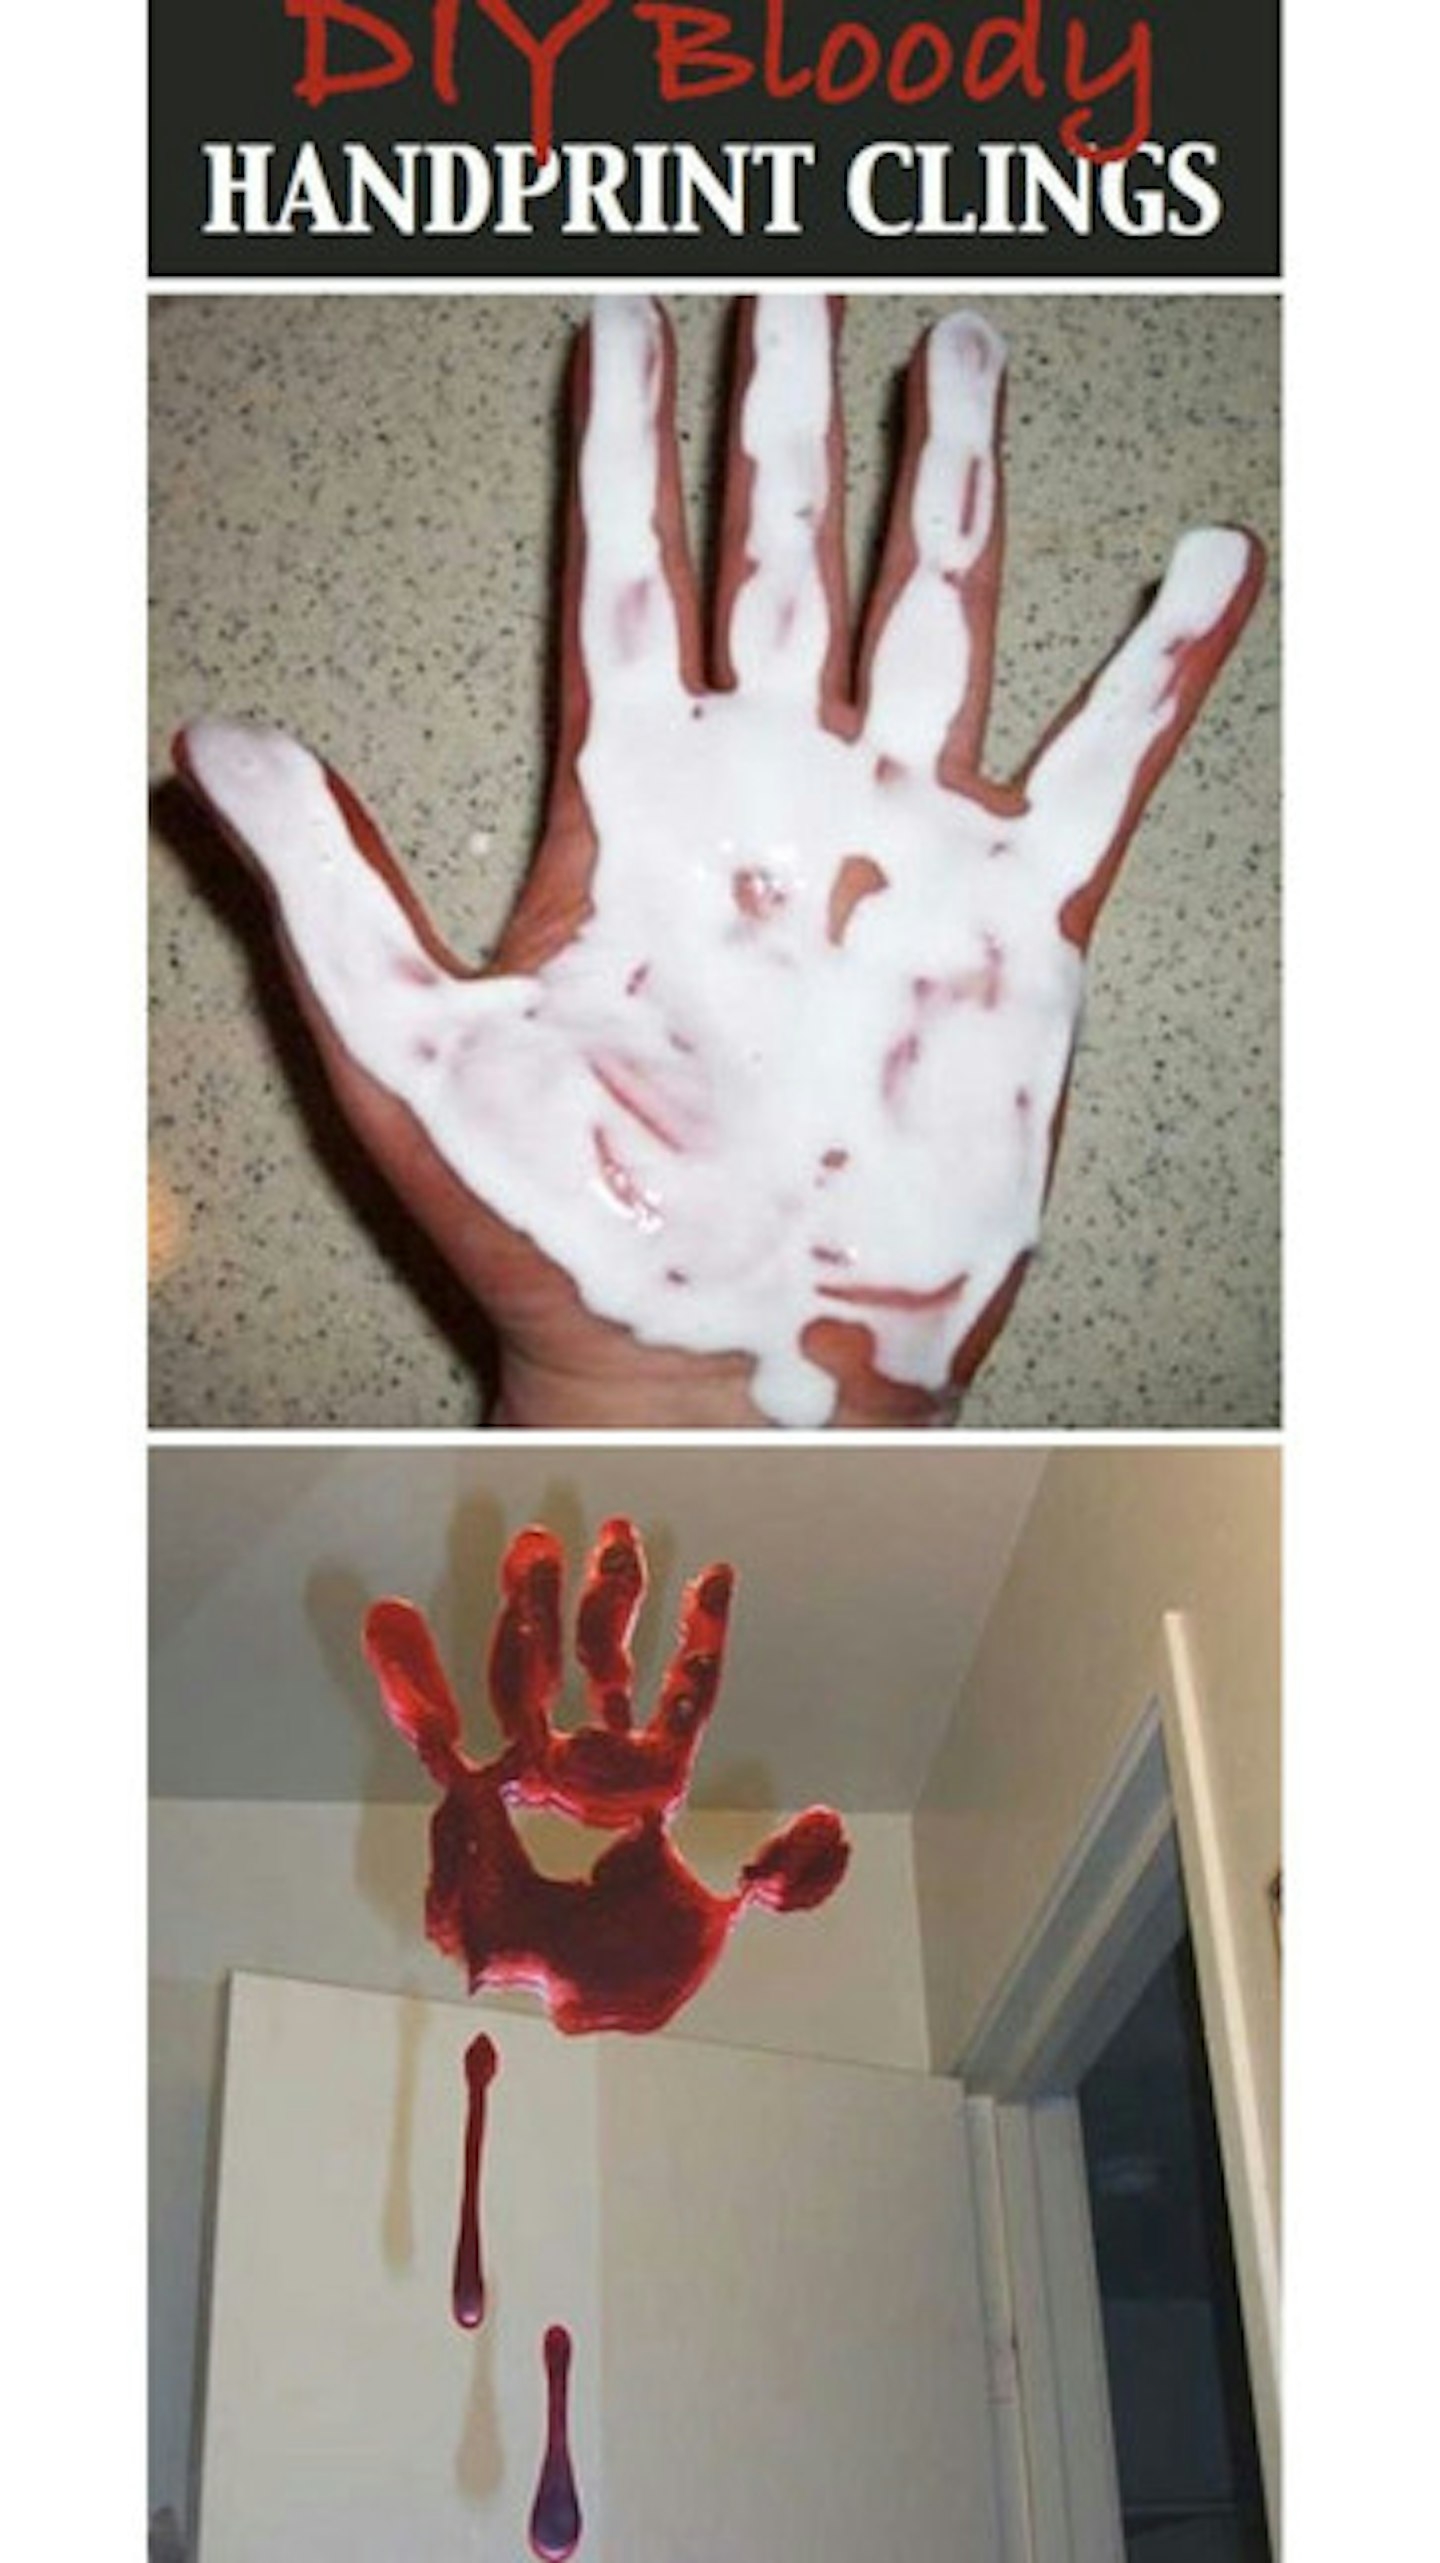
Err, something terrible happened here we imagine. Something truly terrible…
Or, at least, that’s what your guests will be left thinking when they spot these bloodied handprints all over your Halloween party!
You will need…
-
Elmer’s Glue
-
Red food colouring
-
A hand (or two!)
Let’s break it down into easy-to-follow steps…
-
Mix the Elmer’s Glue with red food colouring until it resembles the colour of blood.
-
Paint it onto your hands and allow the prints to dry.
-
Gently peel them off and you should have two VERY realistically bloody handprints - that will cling to just about any smooth surface!
-
Try adding to your windows, a mirror, or a glass door for maximum scream factor.
10. An infestation of rats and mice
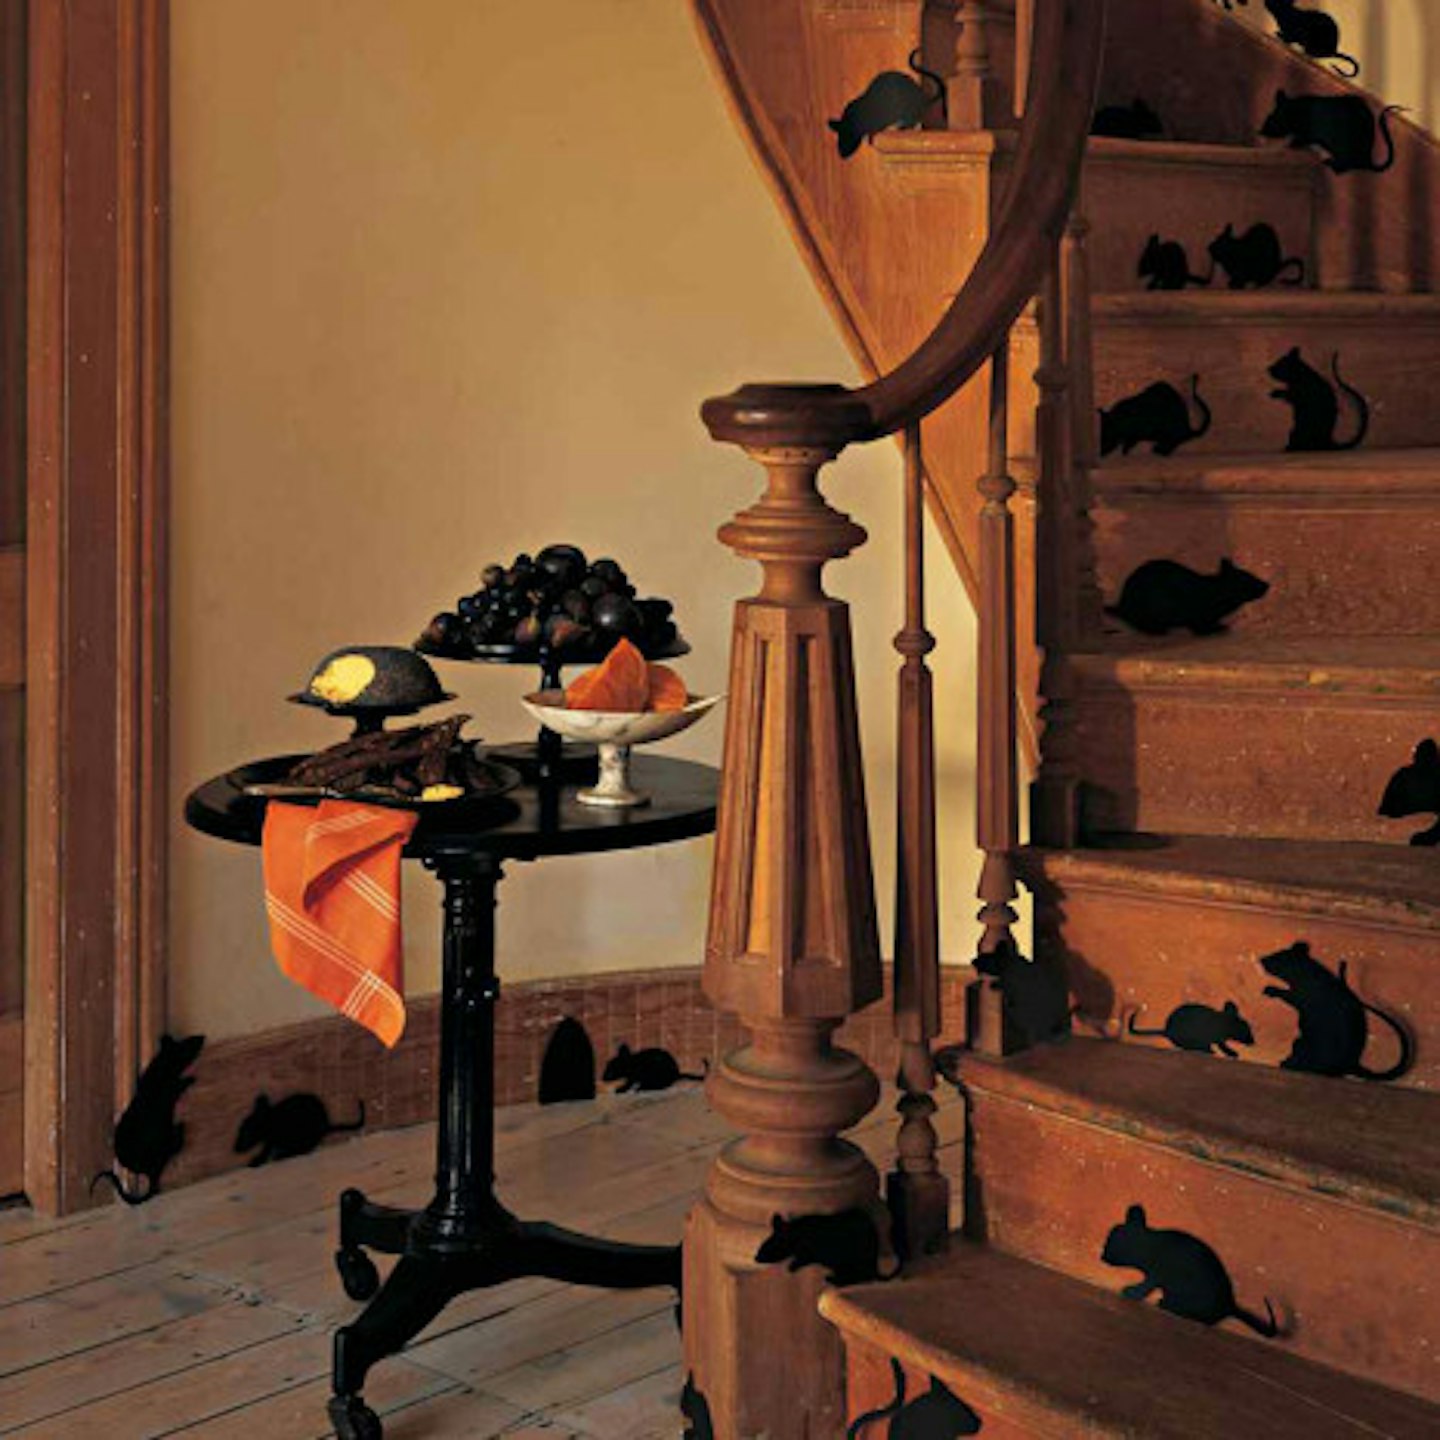
Imagine your home filled with scuttling rats and mice and we imagine you’ll soon be biting back a scream of terror. So why not recreate that feeling with these spooky creepy, crawly paper mice? This will definitely impress your Halloween party guests.
You will need…
-
Black construction paper
-
Pencil
-
Scissors or craft knife
-
Masking tape
-
Mice templates
Let’s break it down into easy-to-follow steps…
This one’s easy; you just need to head on over to the Martha Stewart website, print out their handy templates, trace them out onto black construction paper, and cut them out.
Stick them around your home with masking tape and you might just give a few of your unsuspecting Halloween party guests a jump!
Haunted house mirror
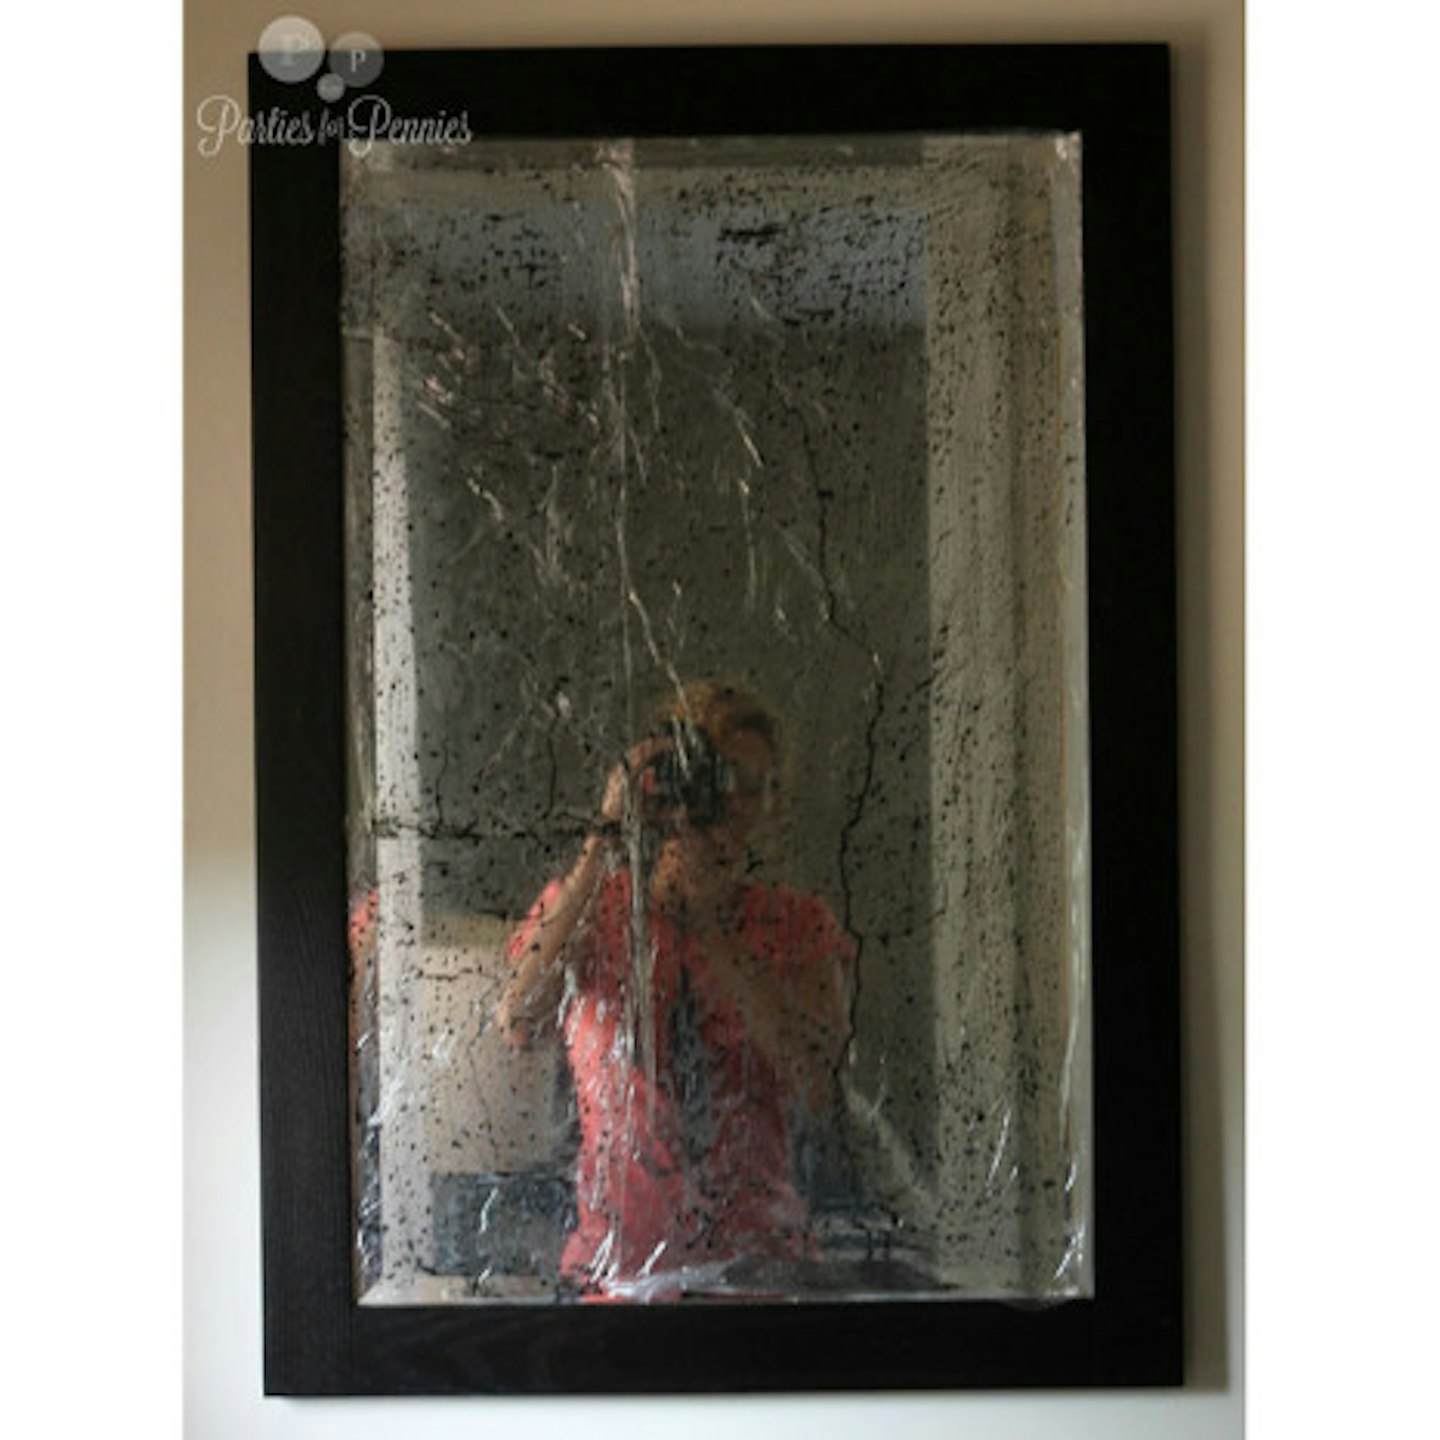
Mirrors have long been thought of as doorways for unworldly spirits to sneak out of - so why not transform yours into a creepy centrepiece for your halloween party? Think of all the cool Instagram photos you can get with this mirror?
You will need…
-
Cling film
-
Watered-down black acrylic paint
Let’s break it down into easy-to-follow steps…
This one’s really very simple’; it’s just a case of covering your mirror with the cling film and carefully painting it.
12. The threatening message...
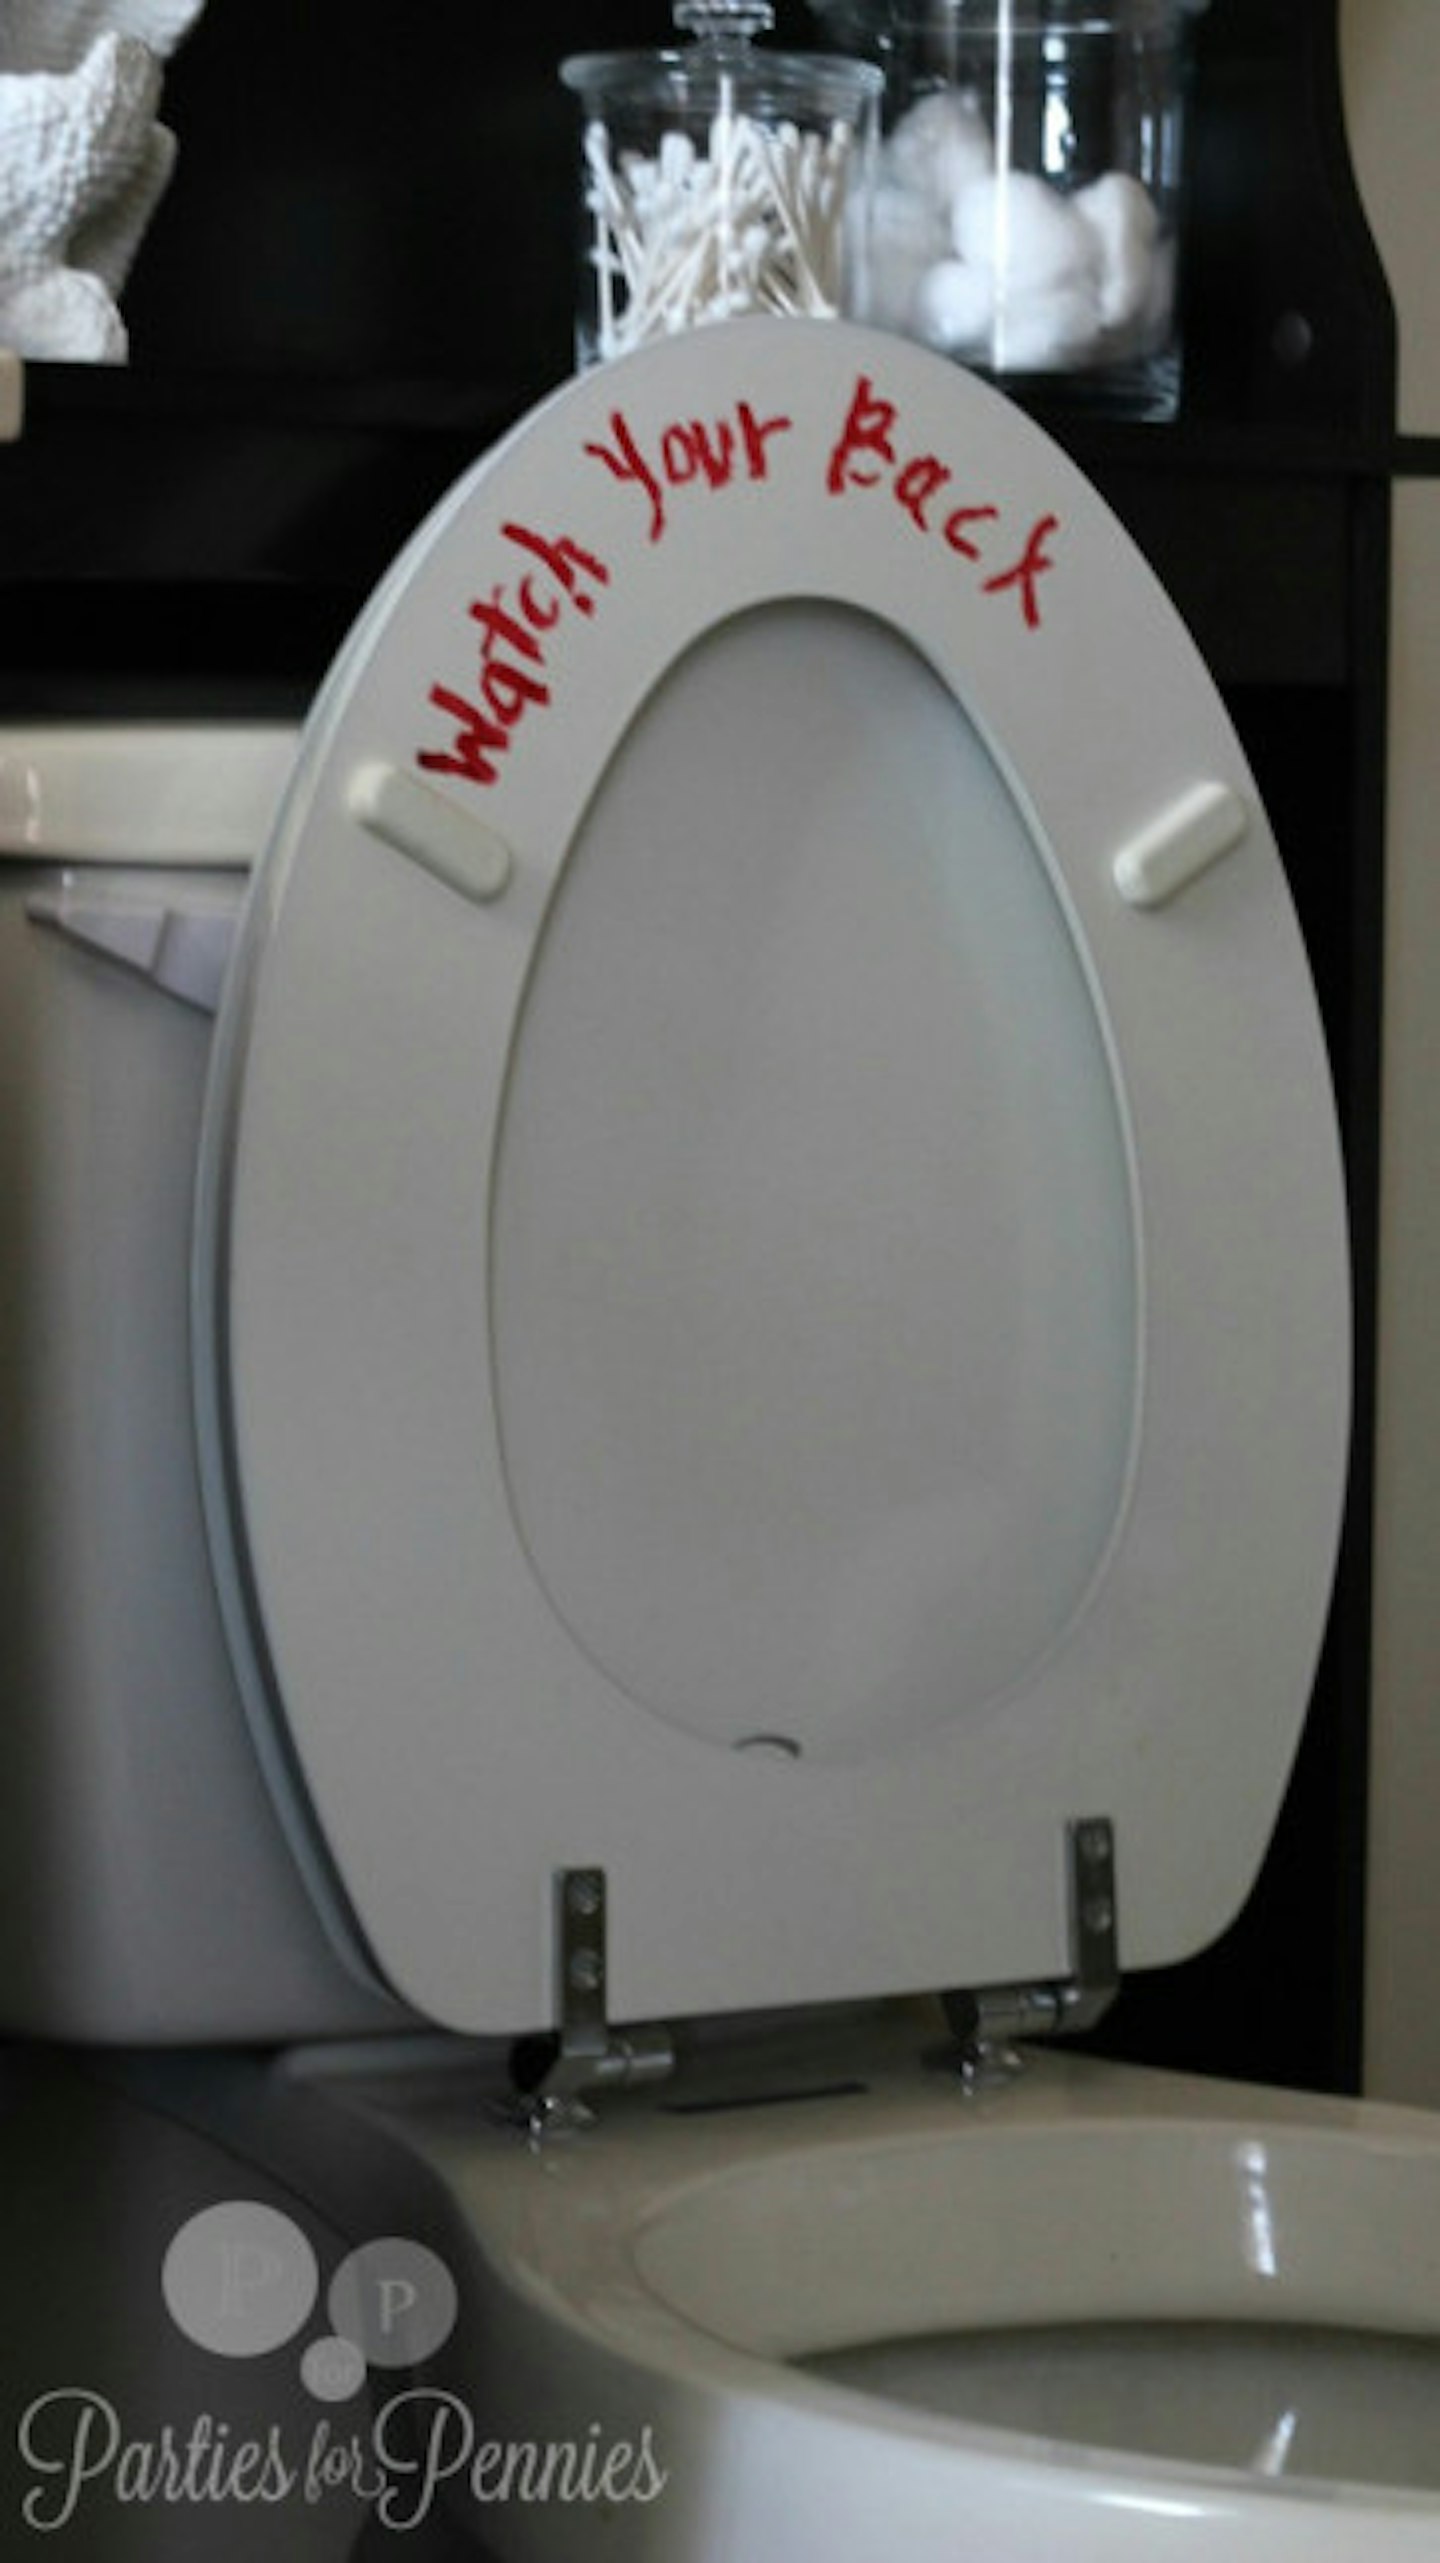
Bathrooms, eh? As we all learned from Hitchcock’s Psycho, they’re not the safest places to be… especially at Halloween.
So why not give your male guests a fright with this spooky, yet ultra effective, toilet message?
You will need…
-
Red lipstick
Let’s break it down into easy-to-follow steps…
We’re sure you can guess the process for this one; it really is just as simple as writing out a warning to anyone who lifts up the toilet seat. We'd recommend not using your favourite lippie though, who would use it after it's been on the toilet? Maybe pop down to a cheap shop and get a red lipstick that you can chuck after Halloween.
Also, make sure you check out Parties For Pennies’ page when it comes to this particular project, as they have a few extra tips which you may want to factor in…
13. Ghastly severed head
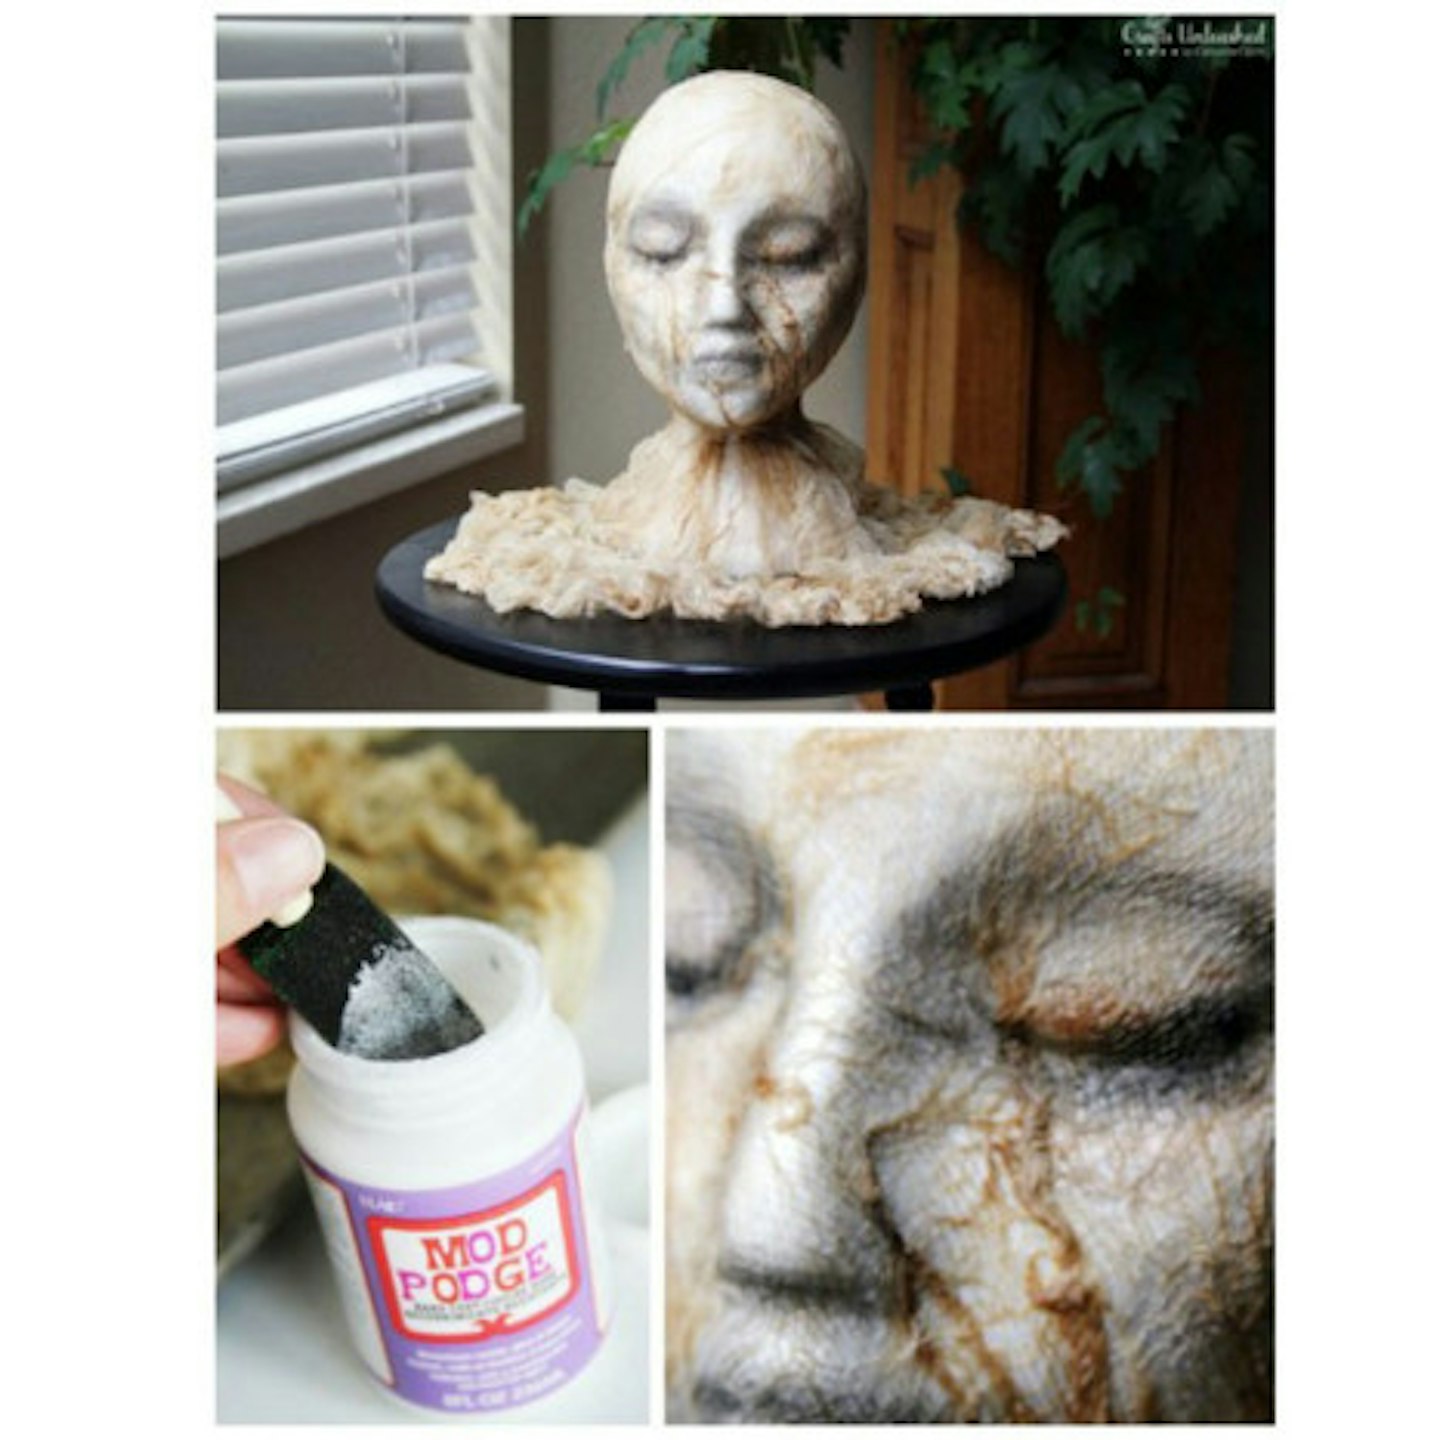
If you really want to impress / terrify your Halloween guests, try this mummified severed head from Crafts Unleashed.
We promise that it’s not anywhere near as difficult as it looks…
You will need…
-
Craft Foam Display Head
-
Fabric Stiffener
-
Cheese Cloth
-
Mod Podge Hard Coat
-
Foam Brush
-
Black Ink Pad
-
Foam Pad (for blending ink)
-
Jute Twine
-
Coffee
-
Cookie Sheet
-
Gloves (optional)
-
Oven (optional)
Let’s break it down into easy-to-follow steps…
To find out how to make this severed head (yuck!) make sure you check out the Crafts Unleashed website for the full instructions on what to do; they’re pretty much experts when it comes to stuff like this!
14. Sticky spiderwebs
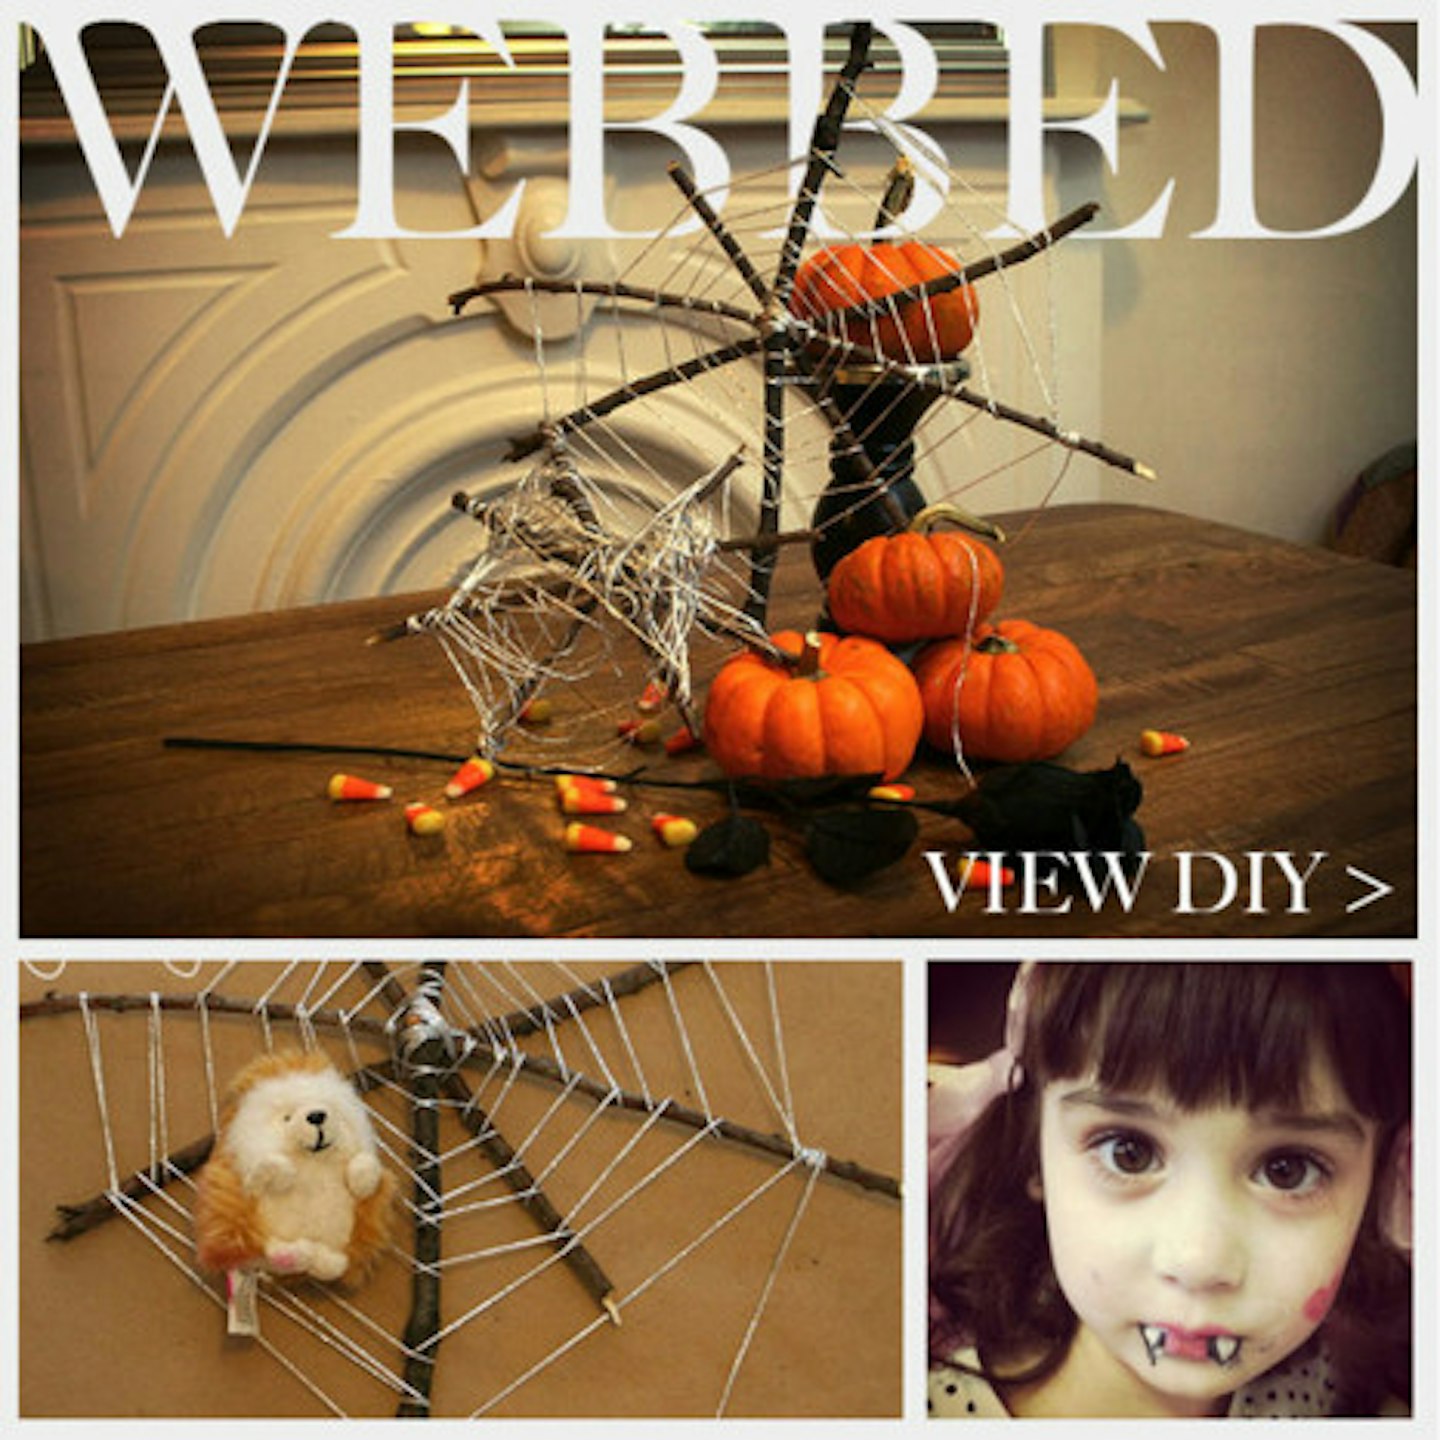
If you fancy something a little more intricate than the black bin bag spider webs from earlier, then these spooky webs are the ones from you.
Made from twigs and sparkly yarn, they add a dash of creepiness to your Halloween party - whilst still looking VERY pretty in the process.
You will need...
-
Sticks
-
Sparkly yarn
-
Scissors
-
Hot glue gun
Let’s break it down into easy-to-follow steps…
This one’s a little fiddly, but it’s all about creating a pretty spiderweb using really basic (and mostly free!) materials.
Check out the Trinkets In Bloom website for the full instructions.
15. Halloween DIY project: Spooky silhouettes at the window
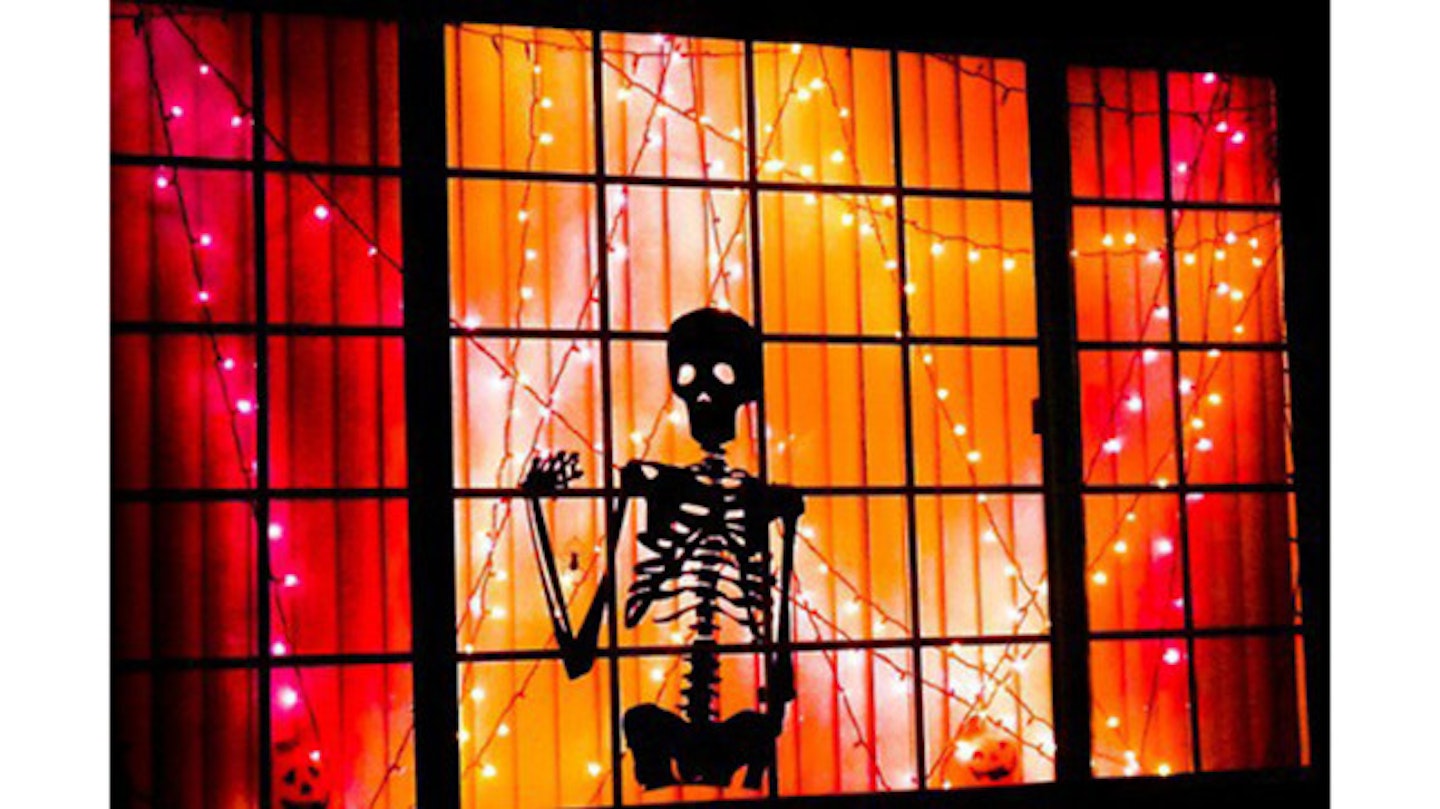
Decorating your windows with silhouettes is a spooky - and simple - way to welcome your guests on Halloween.
You will need…
-
Black card
-
Scissors
-
Pencil
-
Orange tissue paper
-
Clear double sided tape
Let’s break it down into easy-to-follow steps…
This one is all about sketching out spooky shapes onto the card, cutting them out, and sticking them in your windows (on a backdrop of orange tissue paper, of course).
Pretty easy, right? And pretty purse-friendly, too!
Get more details on this (and more window inspiration) over at Shelterness now.
16. Doctored dollies from Hell
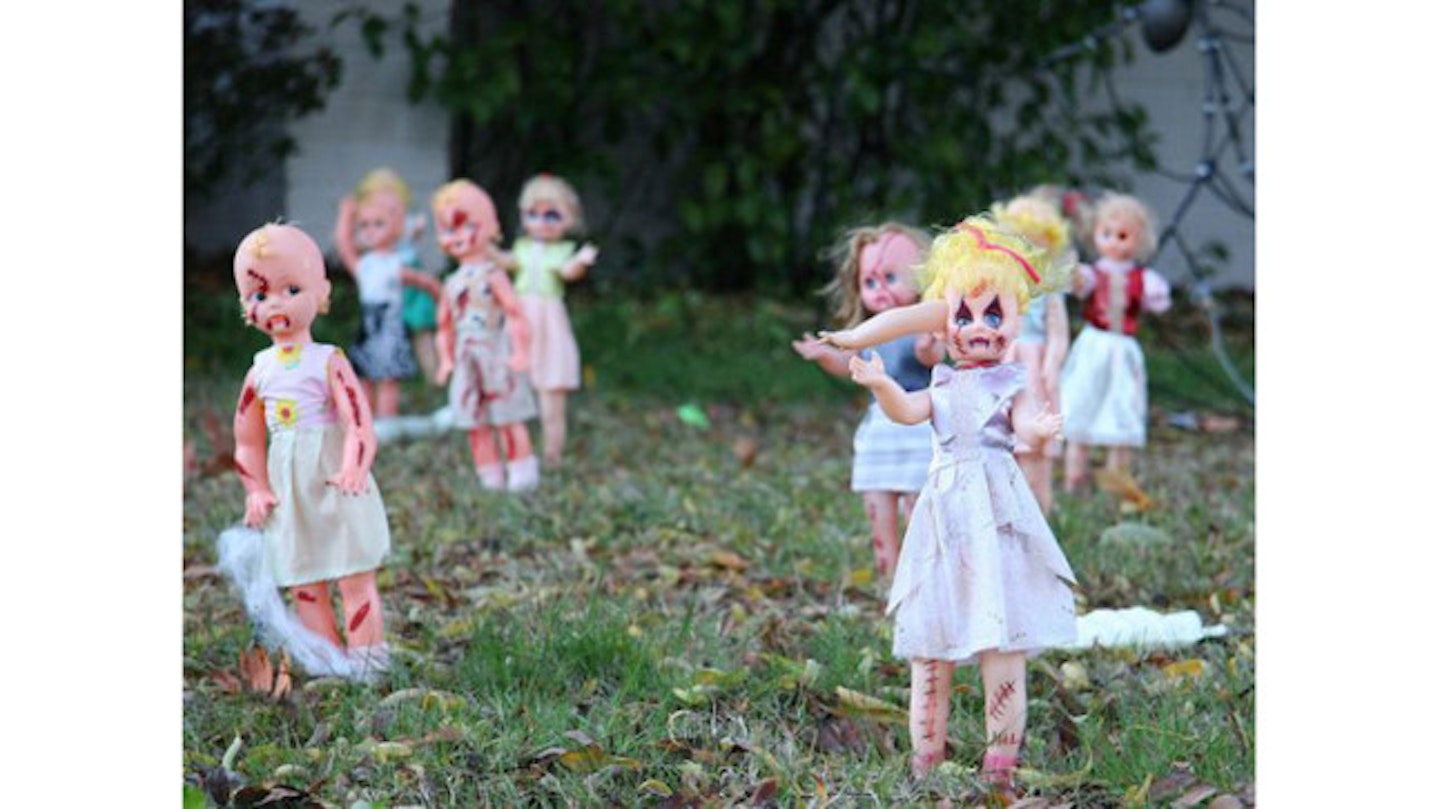
Dolls. Dolls are the most creepy things of all time, doctored or not - but these little monsters are sure to send shivers down people’s spines.
You will need…
-
Cheap dolls (try your local Pound Shop)
-
Black felt and red tip pens
-
Glue (optional)
Let’s break it down into easy-to-follow steps…
Go to town on those dolls, basically - you want little zombies wandering through your home.
Get the full details on Homedit now.
17. The severed head
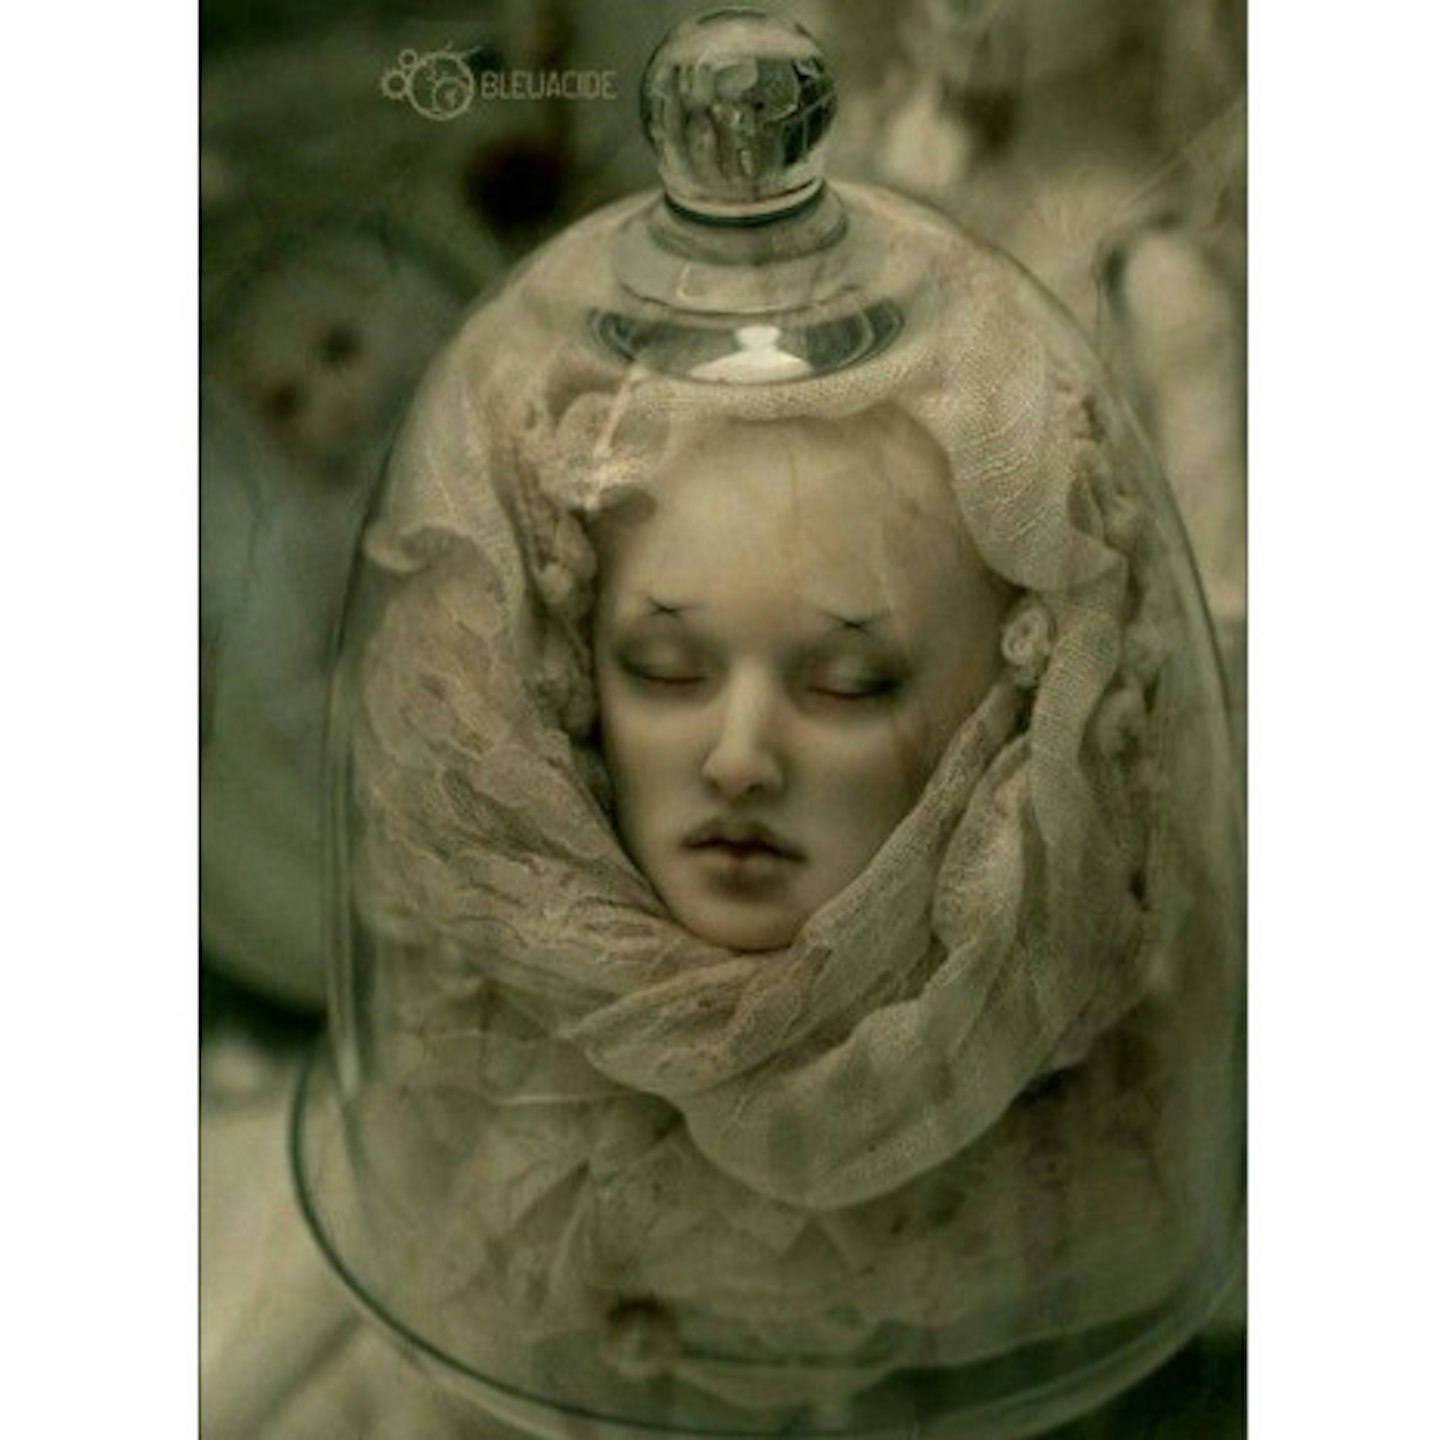
This one might just be a little too scary for us - but, if you’re feeling brave, it’s an easy one to craft for your own Halloween party.
You will need…
-
A mannequin head
-
A glass dome (the type used for covering cakes)
-
Tea bags
-
Water
-
Cheesecloth
-
Black pens
-
White paint
Let’s break it down into easy-to-follow steps…
You want to, as you did with the spell book, soak your cheesecloth in a solution of tea and water, to make it look older and stained by time.
Then it’s up to you to decorate your head, wrap it in your cheesecloth shroud, and pop it under the glass dome.
Get the full details on the Homedit website now - if you dare!
18. Keep it skewed
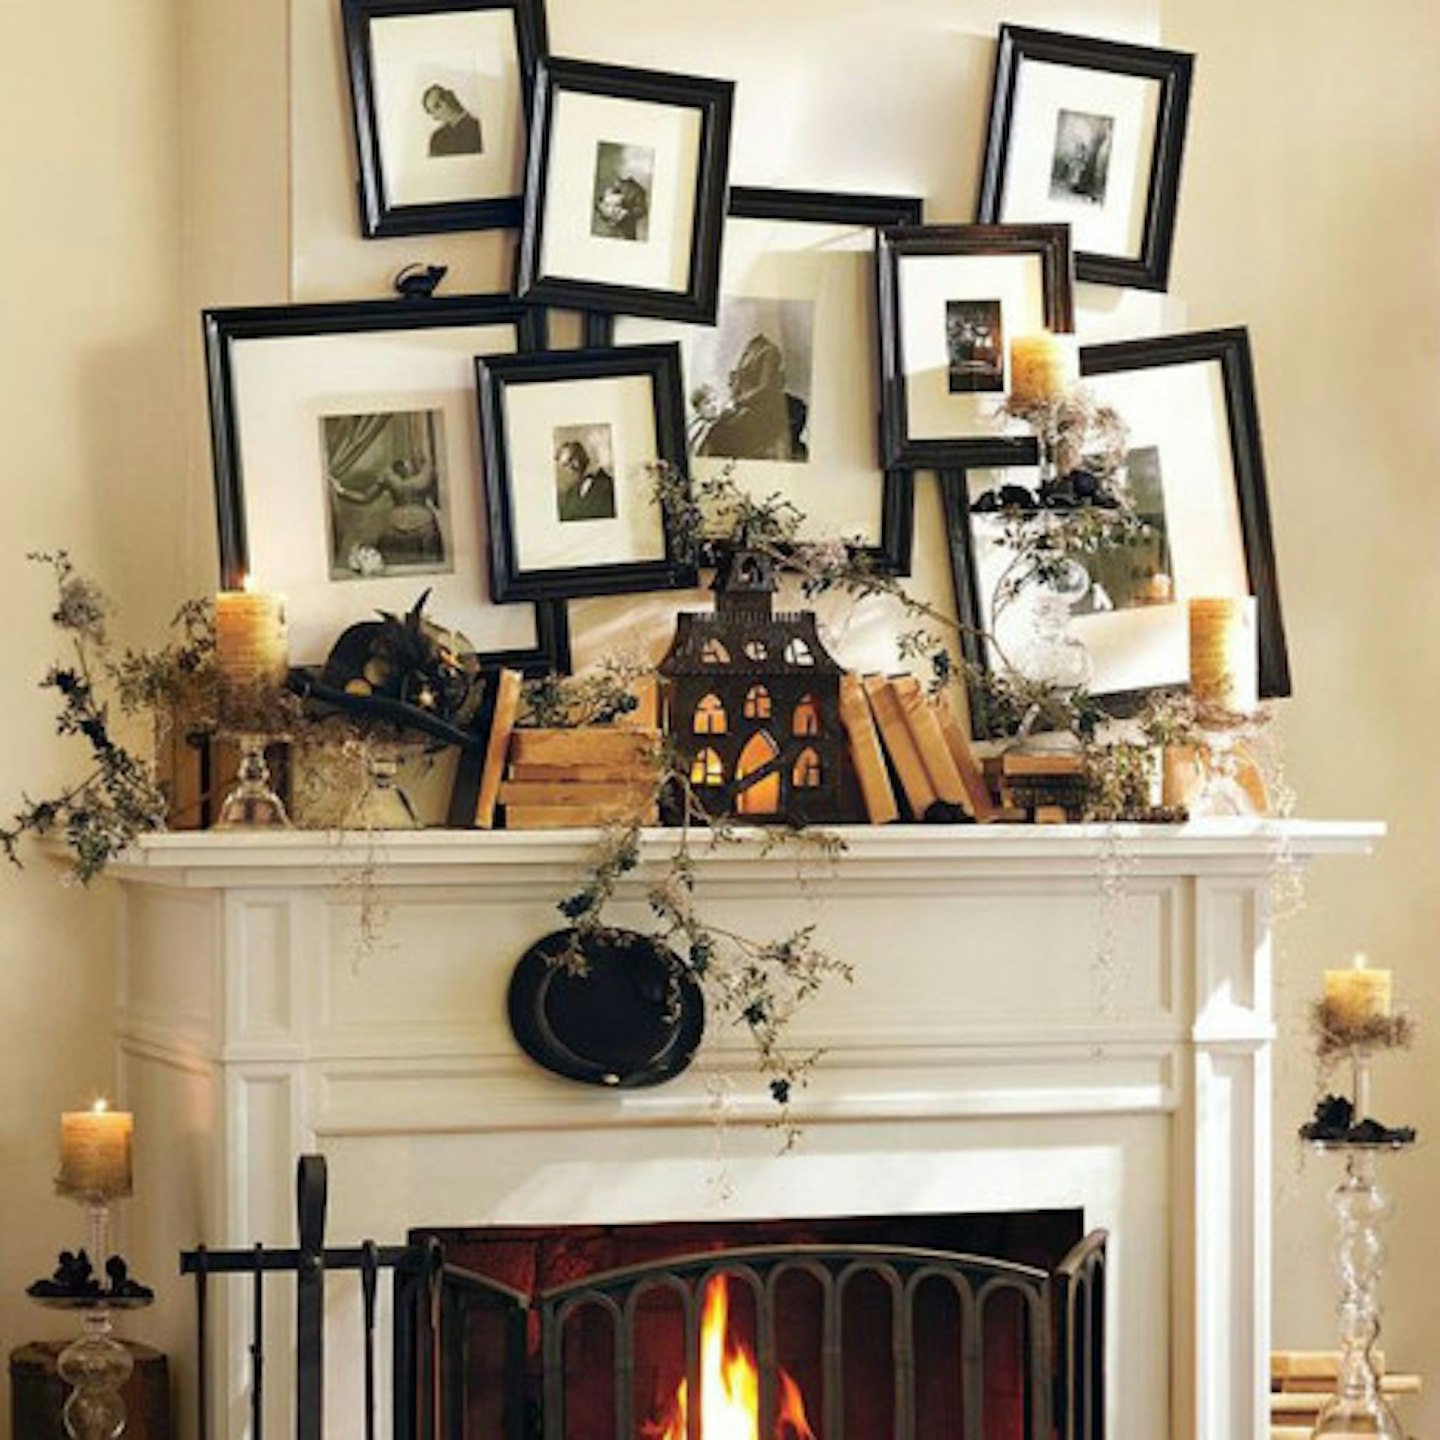
What could be more Haunted House than this, eh?
You will need…
-
Photo frames in different sizes
-
Printed black-and-white photos (hit up Google for some spooky Victorian images)
-
Books
-
Candles
-
Branches
Let’s break it down into easy-to-follow steps…
This one’s more about your own vision than following directions, but Homedit have plenty of advice on how to nail this Halloween look.
19. The watchful family portraits
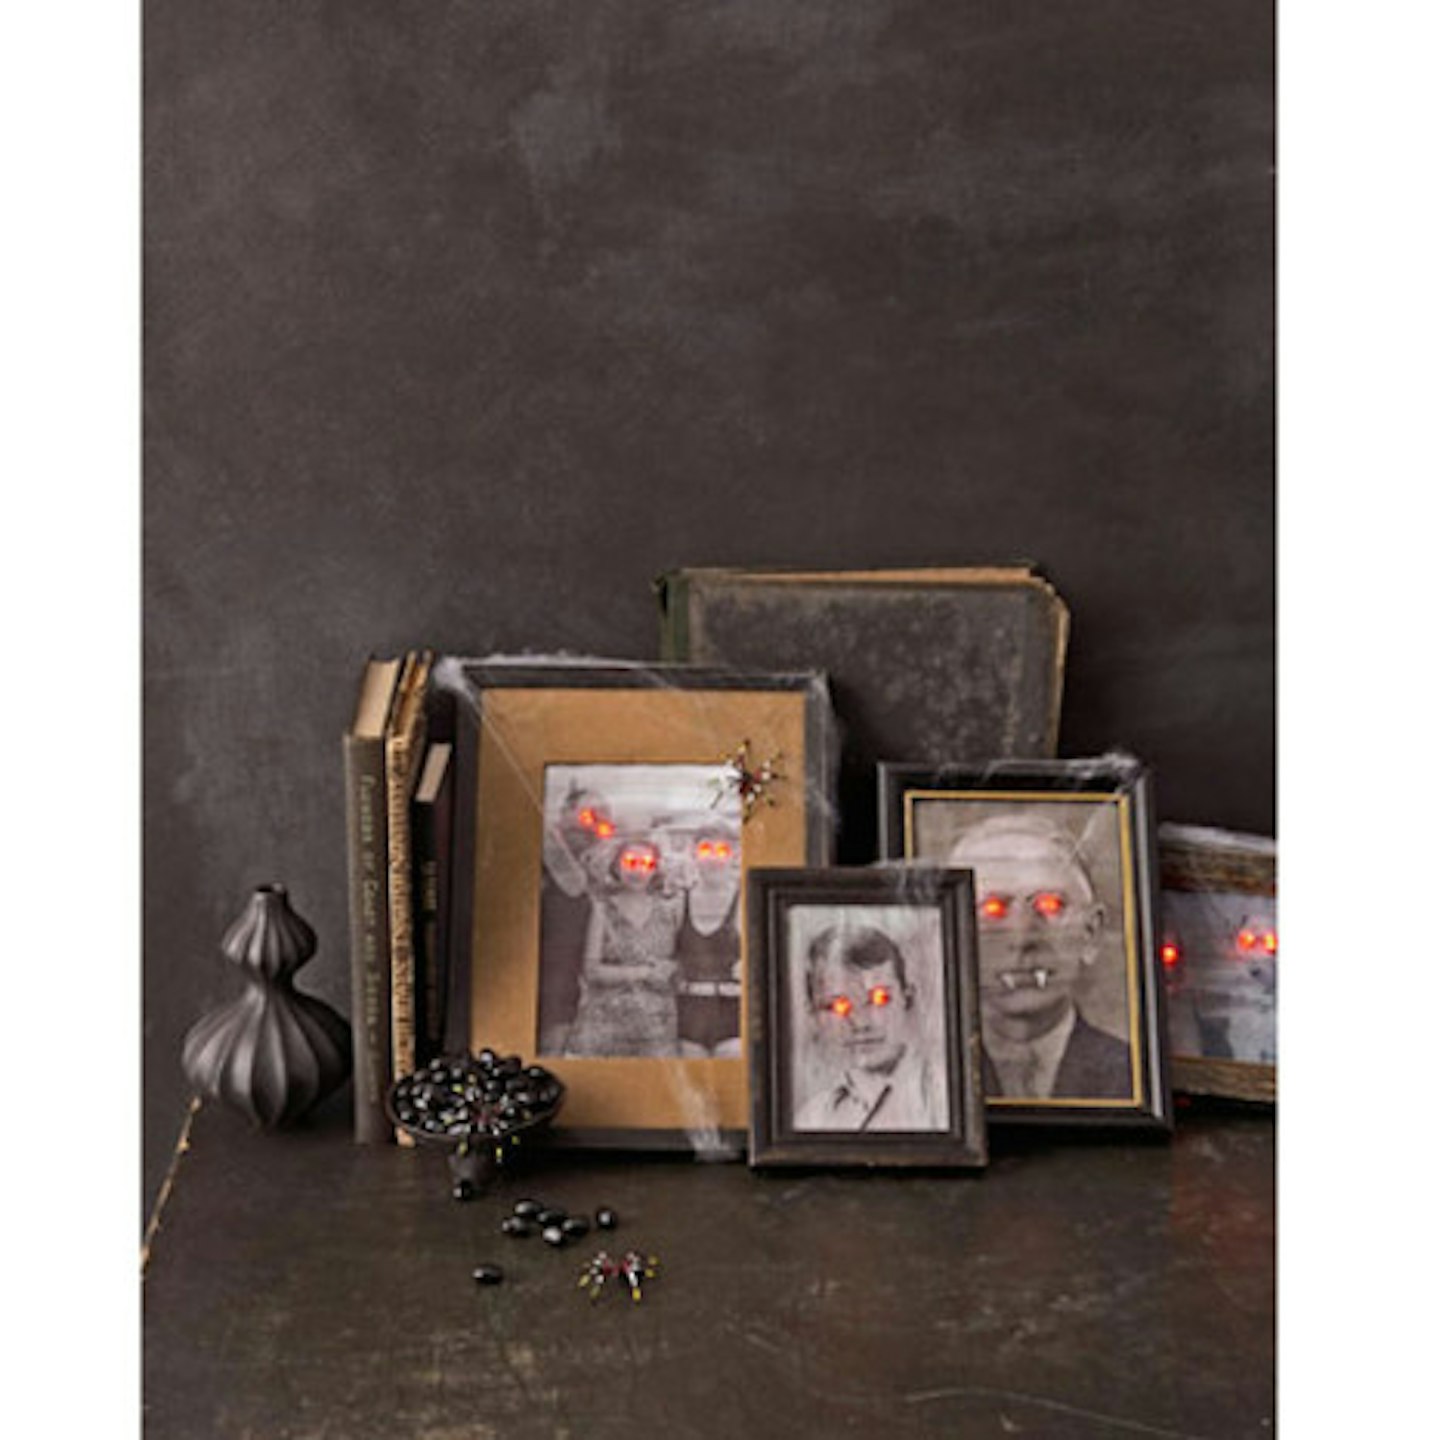
The eyes are following me around the room, your guests will be thinking as they wander helplessly through your Halloween party.
And then, all of a sudden, they realise the eyes are glowing bright red…
You will need…
-
Copies of your family portraits (ideally in black and white)
-
Photo frames
-
Red LED lights
-
Fake spiderwebs
-
Scissors
Let’s break it down into easy-to-follow steps…
You can probably guess the process for this one (cutting out holes in the eyes and poking red LED lights through it), but we recommend hitting up Babble for their advice on how to do this safely and properly.
20. 'Boo!' bottles
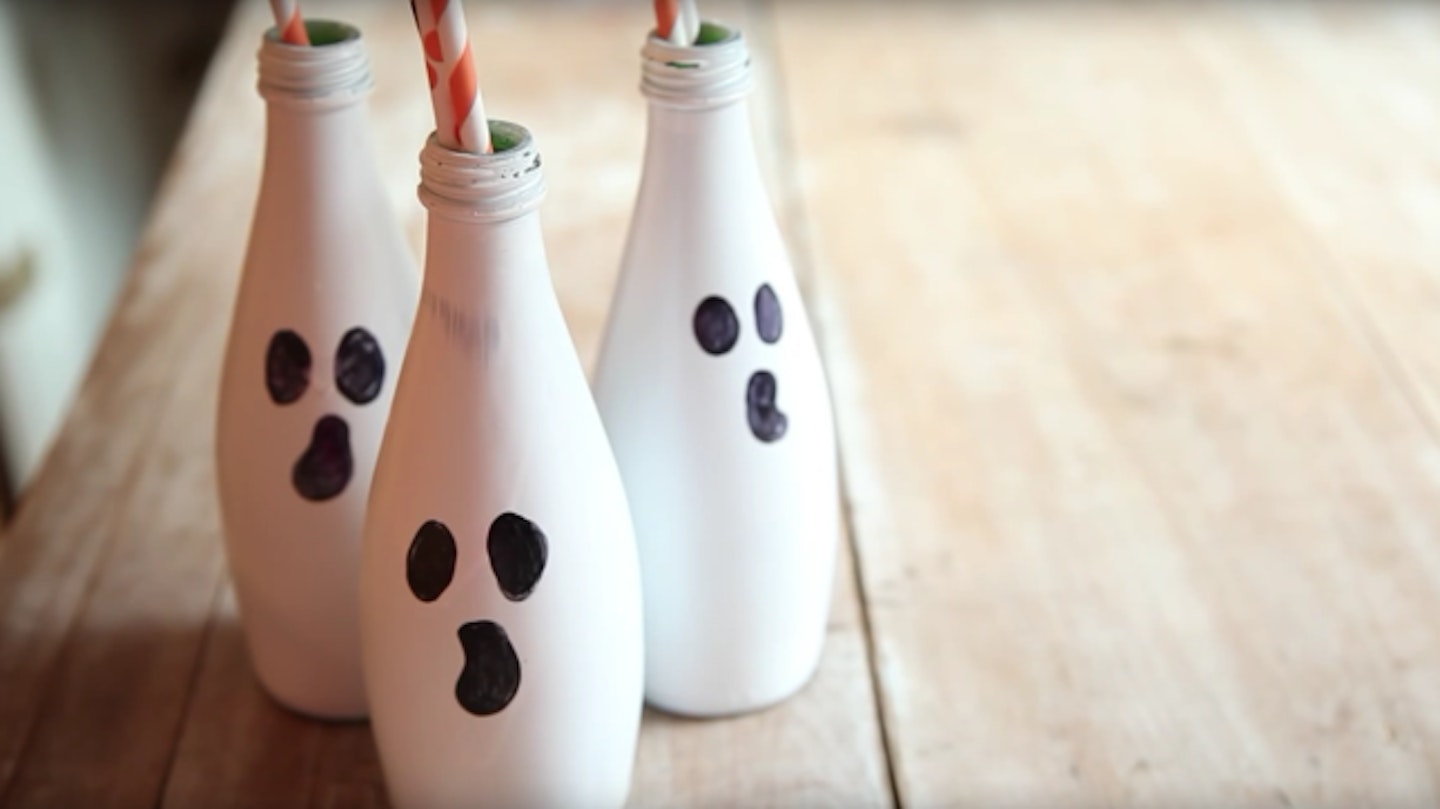
Whoever said Halloween had to be scary?
These ‘BOO’ bottles are cute, but they still fit the theme - and they might be a little more family friendly for those with children attending their Halloween party.
You will need…
-
Glass bottles
-
White spray paint
-
Black permanent marker
-
Coloured straws
Let’s break it down into easy-to-follow steps…
-
Remove labels and caps from the bottles.
-
Wash the bottles and dry them well.
-
Spraypaint them white and set aside to dry.
-
Draw on ghostly faces with permanent markers.
-
Pop in coloured straws for a cute centrepiece.
21. Wicked witch's candy dish
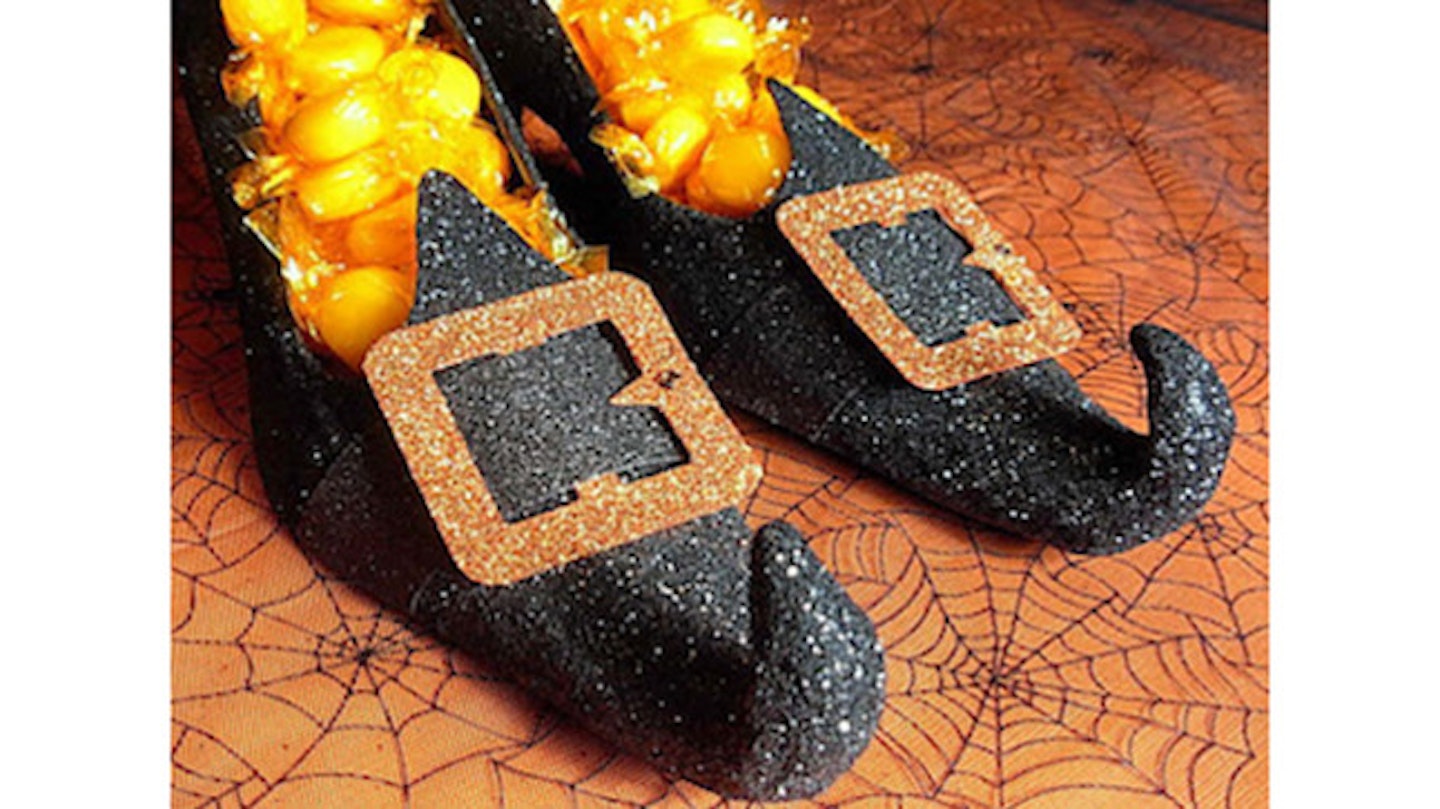
Whoever knew a witch’s feet could look so delicious, eh?
You will need…
-
Old pair of high heeled shoes
-
Sparkly black paper
-
Sparkly bronze paper
-
Craft glue
-
Scissors
-
Halloween sweets
Let’s break it down into easy-to-follow steps…
This one, according to Life Art Collide on Blogspot, is super easy. You just need to wrap the shoes in the black sparkly paper and glue it down. Next, cut out buckles from the sparkly bronze paper, and stick down.
Then all you have to do is fill the shoes with treats for a scrummy, yet spooky, surprise!
22. Fluttering bats and ghosts
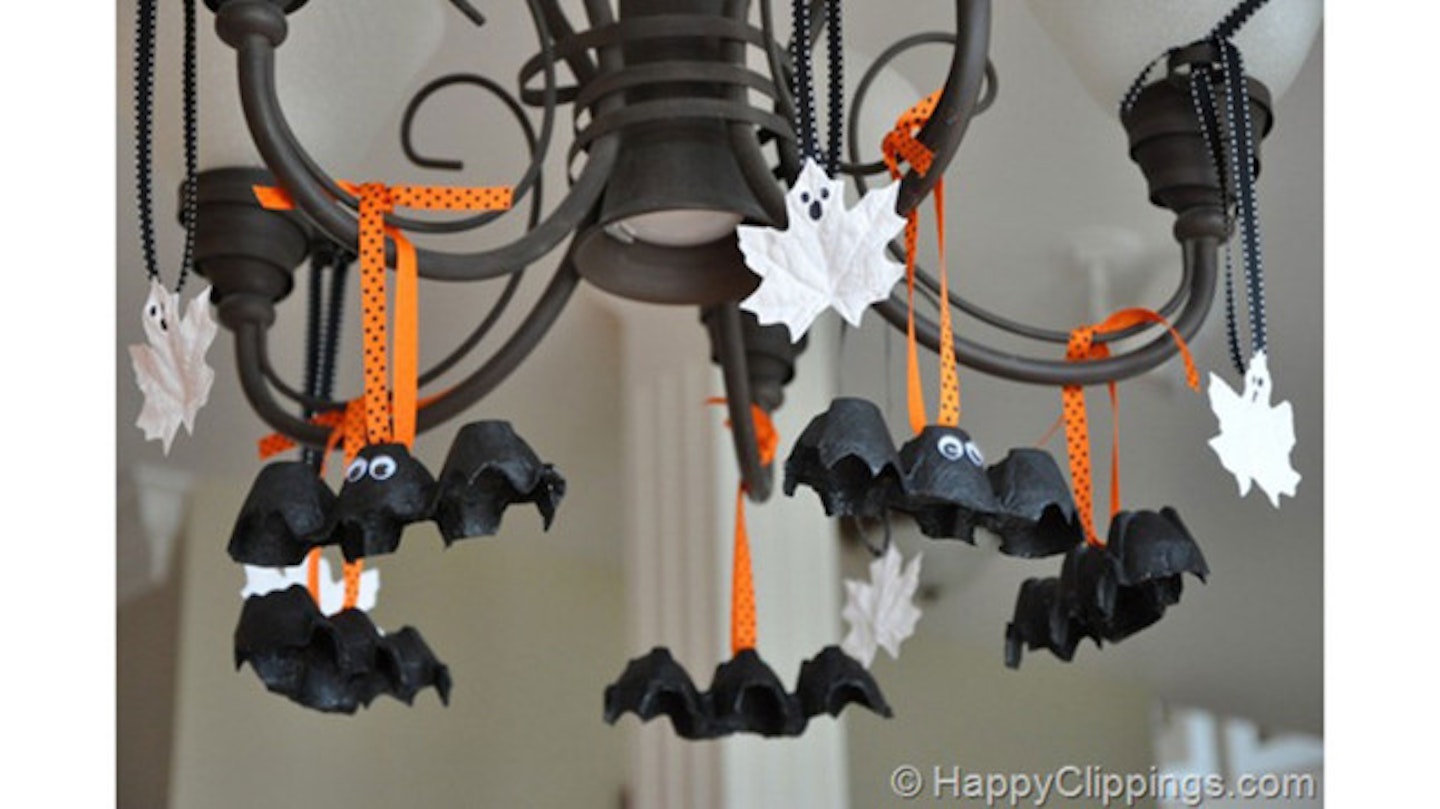
These ones are, again, more family friendly - and your little ones can even help with the crafting!
You will need…
-
Egg cartons
-
Scissors
-
Black paint
-
Paintbrushes
-
Googly eyes
-
Glue
-
Ribbon
-
Leaves
-
White paint
-
Sharpie pen
Let’s break it down into easy-to-follow steps…
Transforming leaves and egg cartons into ghouls and bats might SOUND tricky, but, with Happy Clippings’ easy-to-follow instructions, it couldn’t be simpler.
Just make sure you keep a steady hand when you’re snipping, yeah?
23. Scurrying spiders
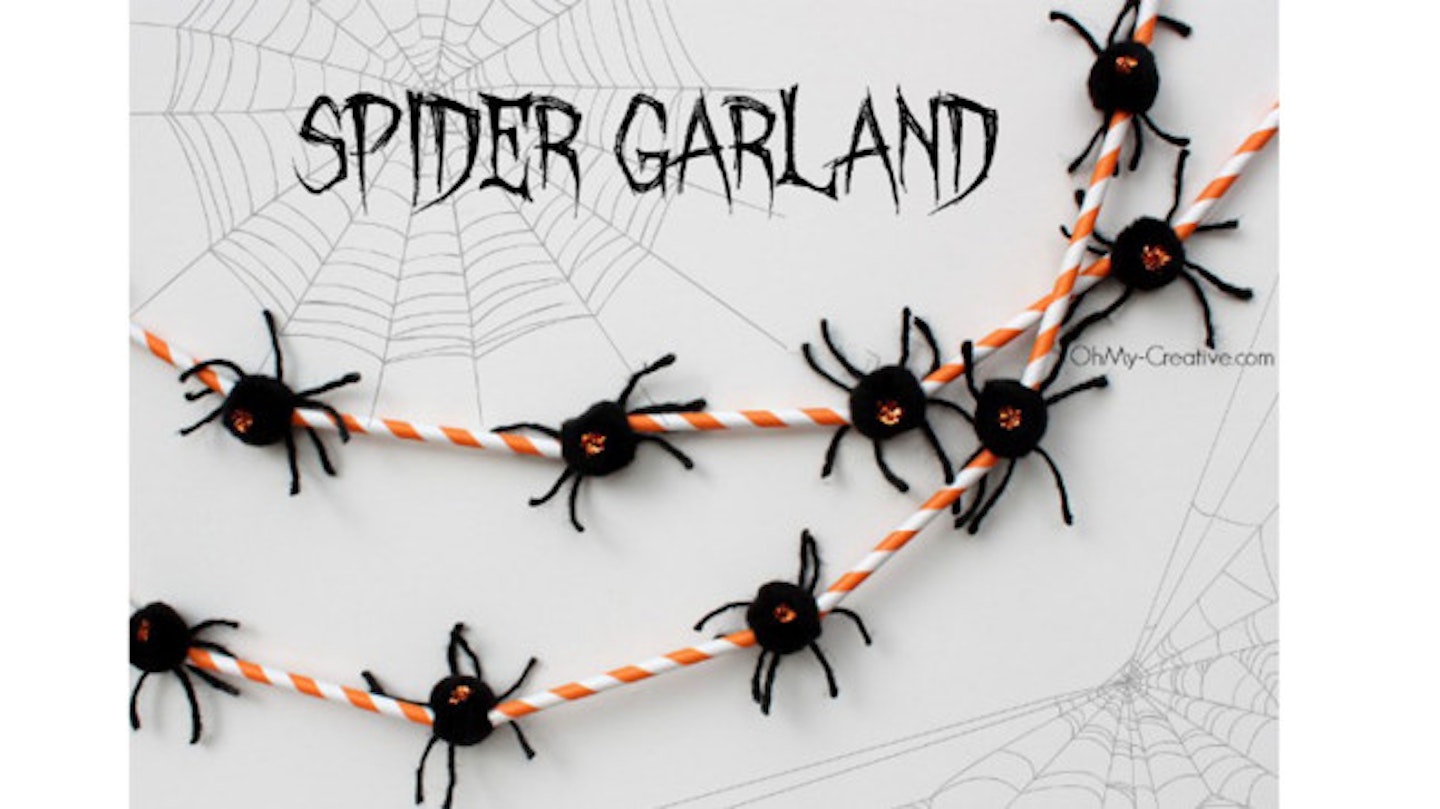
We absolutely LOVE this cute but creepy critter garland from Oh My! Creative.
You will need…
-
Black pom poms
-
Black yarn or wool
-
Glue
-
Orange glitter
-
Paper straws
-
Scissors
-
Needle and thread
Let’s break it down into easy-to-follow steps…
-
Glue black yarn "legs" onto a pom and add a small dot of glue upon which to sprinkle orange sparkles
-
While the spiders are drying (2-3 hours), cut the paper straws in half with scissors
-
Sew through the belly of the spider
-
String them along alternating spiders and straws
However, while it sounds easy (and it is, we swear), there are a lot of fiddly bits, such as measurements and techniques, which you’ll need to visit the Oh My! Creative blog for now. While you’re there, check out a few of their other crafty projects - you won’t be disappointed!
Which of these Halloween DIY projects will you be trying out for the 31st October? Let us know on Facebook or Twitter.
READ MORE
Halloween 2017 Guide: Tips, tricks and ideas to make yours the BEST one yet
Halloween costume safety tips: 10 things you should know when buying your child’s costume